How to migrate from ReportHTML to PSWriteHTML #341
-
|
I am having difficulty migrating my existing scripts from ReportHTML to PSWriteHTML. Any docs, suggestions, and ins-and-outs on how to update my scripts? My Scripts are using most of these ReportHTML CmdLets: Get-HTMLCSS |
Beta Was this translation helpful? Give feedback.
Replies: 1 comment 1 reply
-
|
You can forget about needing to Close anything. The concept of saving is also taken care of by providing filePath to New-HTML, so there's no need to think about it. I recommend starting from scratch than trying to convert your existing commands to new commands because you can create your new output in much less code. Your commands will be:
New-HTML {
    # your content
}
1 section/column with header text. This section holds a table New-HTML {
New-HTMLSection -HeaderText "Subscription Resource Groups" {
New-HTMLTable -DataTable $SubscriptionRGS
}
} -FilePath .\Example7_01.html -Online -ShowHTML2 sections... 1 that holds table, the other one being empty - notice that they go row by row New-HTML {
New-HTMLSection -HeaderText "Subscription Resource Groups" {
New-HTMLTable -DataTable $SubscriptionRGS
}
New-HTMLSection -HeaderText "your next row" {
}
} -FilePath .\Example7_01.html -Online -ShowHTMLSame 2 sections - but if you nest them into New-HTMLSection they will become columns. If you add more sections within that nested section it will keep on adding columns. New-HTML {
New-HTMLSection -HeaderText "Notice how nesting this makes it work on columns" {
New-HTMLSection -HeaderText "Subscription Resource Groups" {
New-HTMLTable -DataTable $SubscriptionRGS
}
New-HTMLSection -HeaderText "your next row" {
}
}
} -FilePath .\Example7_01.html -Online -ShowHTMLIf you want to hide that "top" section - just add invisible switch for the top section New-HTML {
New-HTMLSection -HeaderText "Notice how nesting this makes it work on columns" {
New-HTMLSection -HeaderText "Subscription Resource Groups" {
New-HTMLTable -DataTable $SubscriptionRGS
}
New-HTMLSection -HeaderText "your next row" {
}
} -Invisible
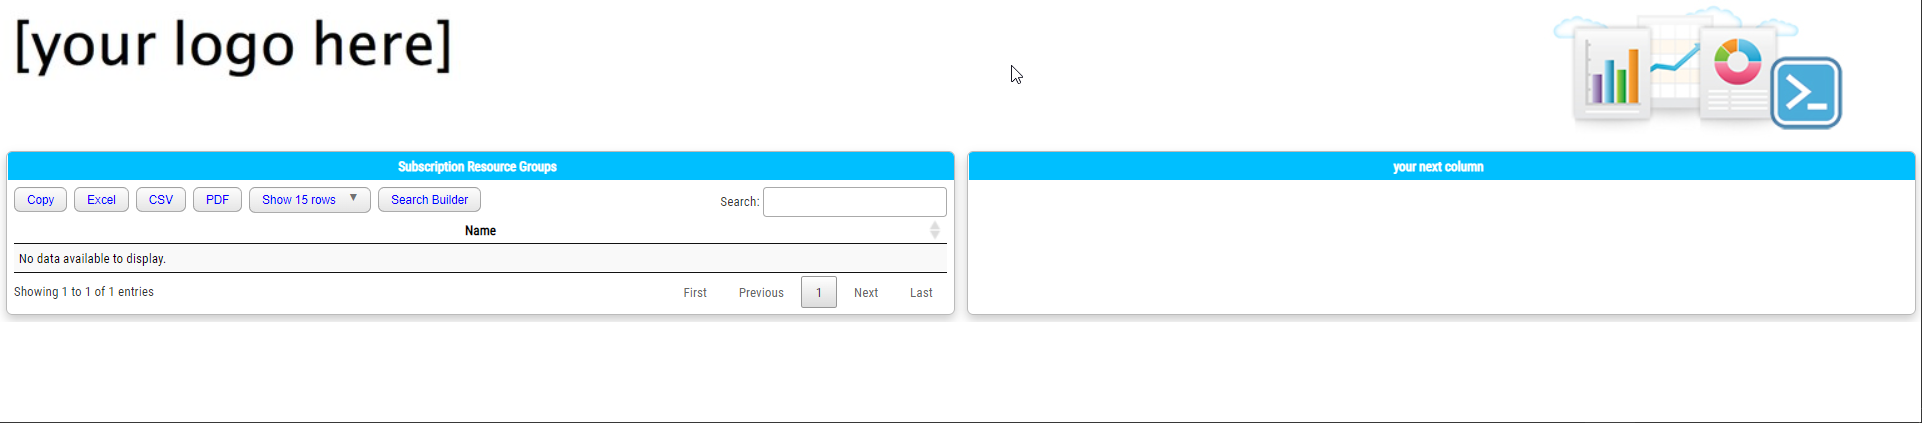
} -FilePath .\Example7_01.html -Online -ShowHTMLIf you want to add logo to it just add New-HTMLLogo inside New-HTML. New-HTML {
New-HTMLLogo
New-HTMLSection -HeaderText "Notice how nesting this makes it work on columns" {
New-HTMLSection -HeaderText "Subscription Resource Groups" {
New-HTMLTable -DataTable $SubscriptionRGS
}
New-HTMLSection -HeaderText "your next column" {
}
} -Invisible
} -FilePath .\Example7_01.html -Online -ShowHTML
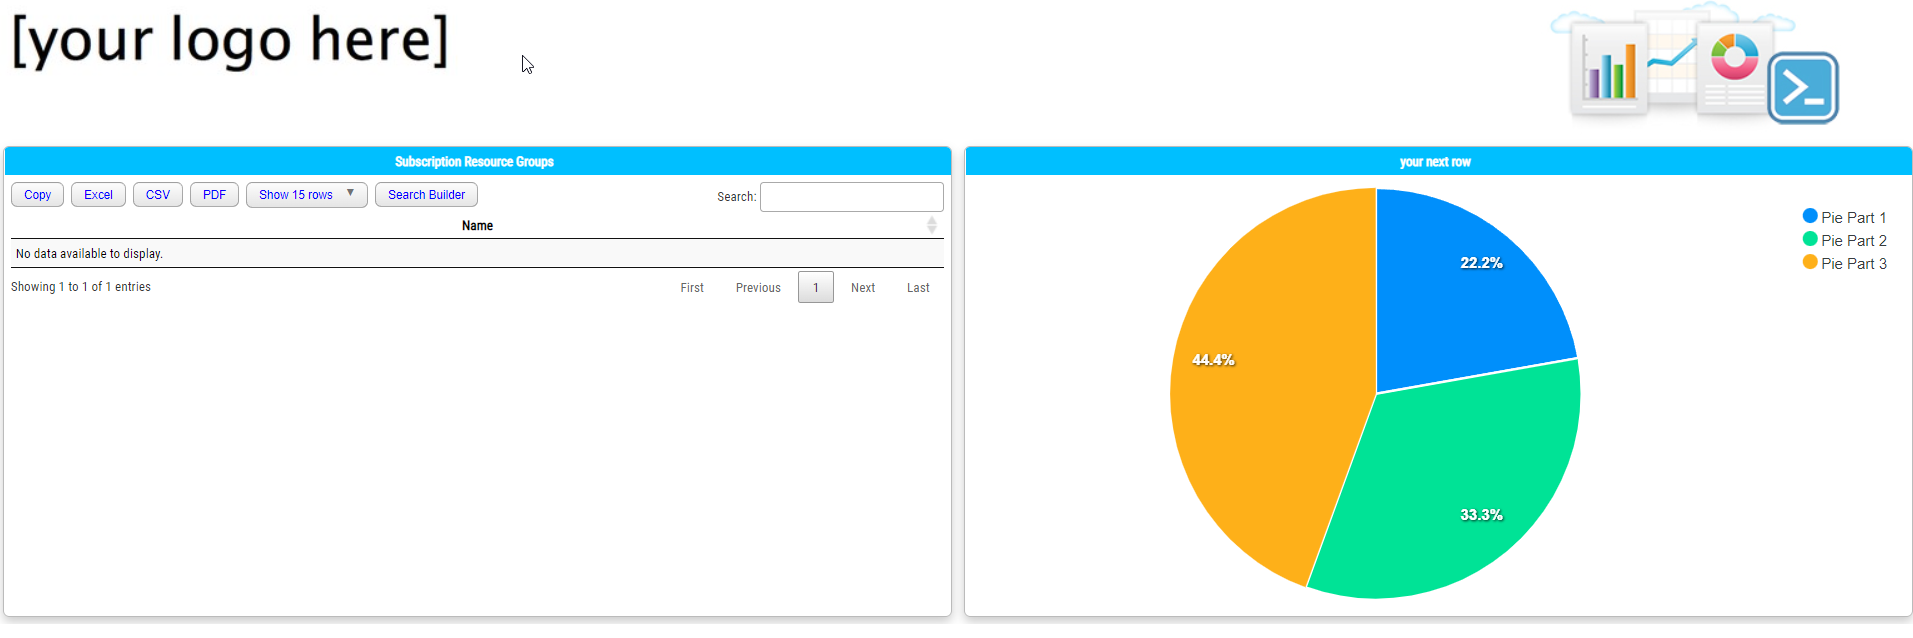
Charts are a bit more complicated. You define New-HTMLChart and then based on what you want to show you add Pies New-HTMLChart {
New-ChartPie -Name 'Pie Part 1' -Value 20
New-ChartPie -Name 'Pie Part 2' -Value 30
New-ChartPie -Name 'Pie Part 3' -Value 40
}It looks like this when used together: New-HTML {
New-HTMLLogo
New-HTMLSection -HeaderText "Notice how nesting this makes it work on columns" {
New-HTMLSection -HeaderText "Subscription Resource Groups" {
New-HTMLTable -DataTable $SubscriptionRGS
}
New-HTMLSection -HeaderText "your next row" {
            New-HTMLChart {
                New-ChartPie -Name 'Pie Part 1' -Value 20
                New-ChartPie -Name 'Pie Part 2' -Value 30
                New-ChartPie -Name 'Pie Part 3' -Value 40
            }
}
} -Invisible
} -FilePath .\Example7_01.html -Online -ShowHTML
If you make a screenshot I can maybe mock something up. |
Beta Was this translation helpful? Give feedback.
-
|
Thanks Kyls Here are some things I am having problems figuring out:
In the past I did things like: .copyright { Thanks In Advance |
Beta Was this translation helpful? Give feedback.
You can forget about needing to Close anything. The concept of saving is also taken care of by providing filePath to New-HTML, so there's no need to think about it. I recommend starting from scratch than trying to convert your existing commands to new commands because you can create your new output in much less code.
Your commands will be: