This is Client built with Walnut - It's a serial monitor at heart, but mixed with NetCat and can also send mouse coordinates. A Serial Monitor communicates with a device over COM Ports or Serial Ports. It does this over the RS-232 Protocol. This is very useful for people like me who commonly interface with Microcontrollers. This application also has the ability to send data to a server instead, and this is cool because some microcontrollers have WiFi chips in them as well. I use this alot in my MakerSpace Club with my team.
Write Up for this project is on my Blog At first, This project was intended to make Michael Reevee's Laser Turret Wireless. This Project uses two Raspberry Pi Pico W's to acomplish this. This Client, I'll call the TurretController, sends commands to a microcontroller (In my case a pico w) connected to the computer via USB Serial Ports. That Pico then either is the turret directly plugged in, or is a medium to connect to the turret wirelessly using raw sockets, Bluetooth, or NRF24l01 modules. Firmware for all of these are in the Examples folder. The Turret will connect to the microcontroller attached to your PC to parse commands. The turret controls Servo Motors to move the Laser, or an LCD/OLED Screen. This setup allows the Laser Turret System to be anywhere in the room, or be controlled remotely anywhere in the world. It uses this library to communicate over serial ports, and is multiplatform. Raw sockets are used for Networking, and all other communications like bluetooth and radio are sent over serial port to a microcontroller to act as the medium. (This will take nrf24 modules or the like)

Clone with:git clone --recursive https://github.com/0xKitKoi/Serial-Comunication-Walnut Once you've cloned, run scripts/Setup.bat to generate Visual Studio 2022 solution/project files. The app is located in the WalnutApp/ directory.
I've included the firmware I used for the Laser Turret in the MicroController Firmware folder, which you will find in EXAMPLES. Examples include Driving the servo motors for the laser turret, and displaying text/animations. This project revolves around the Desktop Application communicating with a microcontroller, but a simple WiFi Echo Server written in C is also included if you wanted to play around. SEE EXAMPLES FOLDER
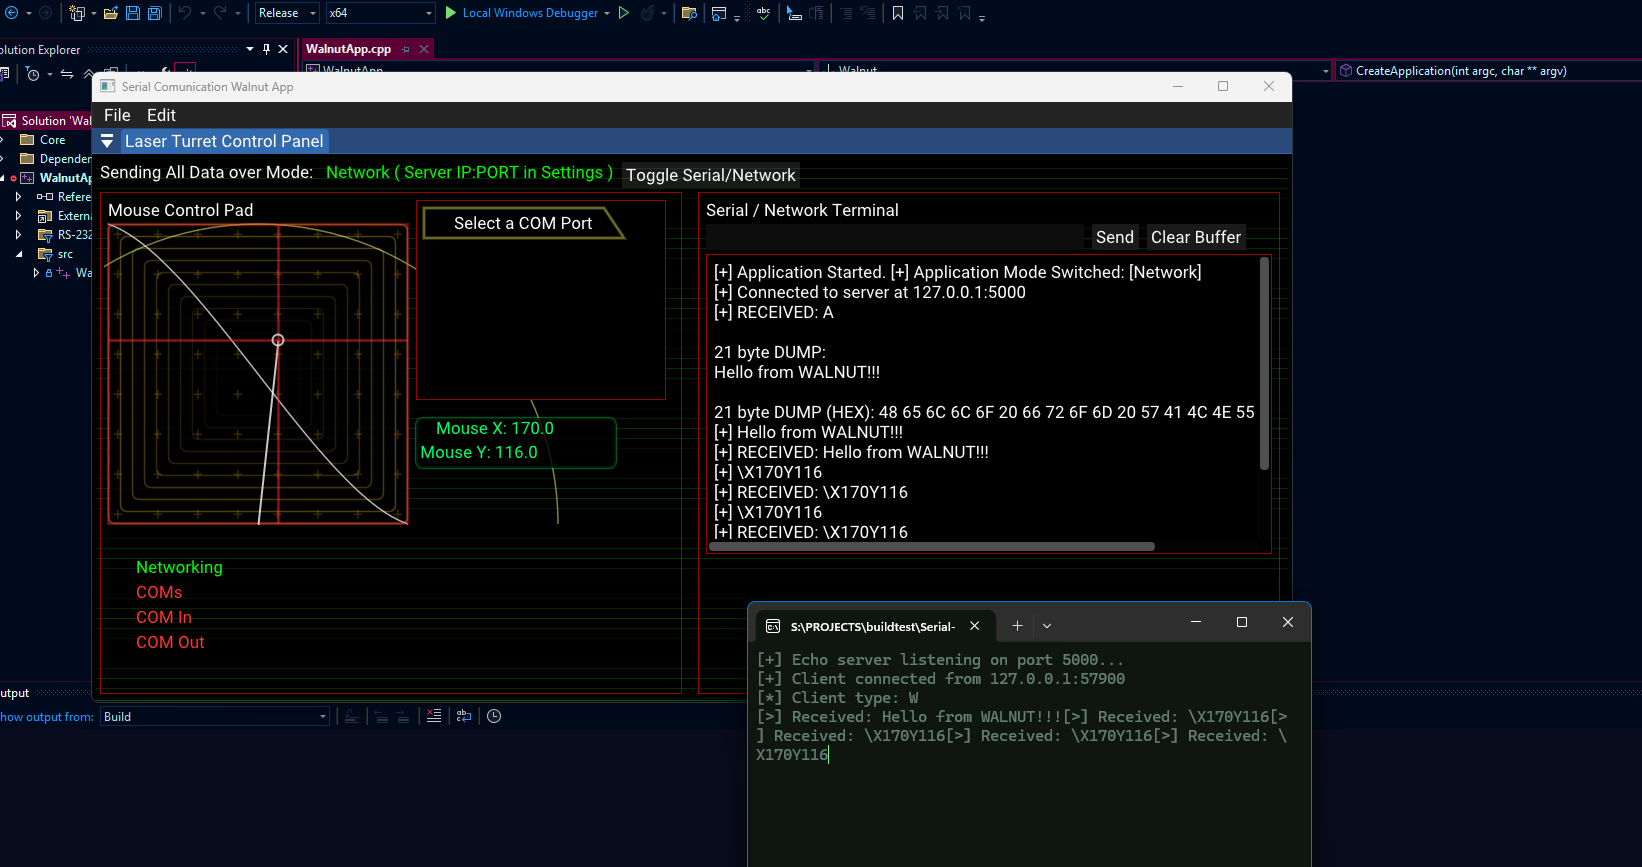
By default, the application is set to text mode. this will allow the user to select a COM port for communcation. When you plug a microcontroller like an arduino into your PC, it should be assigned a COM Port. Select the correct one and send it raw data with the text box. You can also send data to a microcontroller over WiFi. In the settings there is an IP and PORT text box. This is assuming the microcontroller is set up to be the server, and the client will attempt to connect and send data.
This project was intended to be a remake of Michael Reevee's laser turret software he wrote in C# using WinForms. In his video (Link attached), He shows how to pipe mouse coordinates over to the microcontroller to parse, which the microcontroller then uses to control 2 servo motors for Pan and Tilt, all to aim a small laser diode. Selecting mouse mode in my application will display an image to act as our mouse pad. Holding left click will continuously send the mouse coordinates to the selected communication mode, whether that be a com port or an IP address. The structure of the char buffer being sent is as follows:
"\X(INT)Y(INT)\n0"
the backslash helps the microcontroller parse. X and Y are also parsed out, and the ints are extracted. the string is null terminated and a \n is added just for good measure.
if (ImGui::IsMouseDragging(0)) {
    //printf("Holding mouse button down.\n");
    // Michael's arduino parses this to control two servo motors for Pan And Yaw. Yee Haw.
    //char coords[10];
    std::string temp;
    temp += "\\"; // this is a custom command format, the microcontroller will parse this for the ints.
    temp += "X";
    temp += std::to_string((int)relativePos.x);
    temp += "Y";
    temp += std::to_string((int)relativePos.y);
    temp += "\n";

    /// continued ........
}So You'll most likely want to use the turret wirelessly. You have multiple options based on your setup. Wifi is one, Bluetooth is another. Radio seems cooler to me, but all three are implimented in the pico w firmware included here. This is assuming you have a spare microcontroller to act as the dongle/medium. This application uses serial ports to communicate to the microcontroller, it should then parse these commands to send to the turret. If network mode is selected, the application will use WiFi and then tries to host a server for the turret to connect to. You can configure