This repository contains the study code for the paper "pHigment: Designing Biodegradable Single-Use Cosmetics for On-body Chemical Sensing."
Consider replacing existing single-use makeup products with biodegradable, colorimetric biosensing materials. Red Cabbage powder is a colorimetric dye that reacts to pH giving insights into dental, vaginal, and skin health.
pHigment explores the integration of biosensing and biodegradable materials within single-use cosmetics, including temporary tattoos, eyeliner stickers, and press-on nails. These formats often come into contact with body fluids such as sweat, tears, or saliva, and allow for diverse placement on the body, customizable shapes, and a range of colors—features that support the visual transitions of colorimetric biosensors. Unlike conventional cosmetics that absorb into the skin or wear off, these products retain their material structure and are typically discarded after brief use, contributing to landfill waste due to their synthetic components. By focusing on single-use cosmetics, this project addresses both the functional potential of on-body sensing and the environmental impact of cosmetic disposability.
We frame this project around the dual objective of designing on-body colorimetric biosensors that promote health and environmental awareness, while using biodegradable materials suited for single-use lifecycles. We present four main contributions:
(1) The articulation of this duality in biocosmetic interface design. We create a set of working prototypes—eyeliner, temporary tattoos, and press-on nails—that demonstrate how ephemeral cosmetic products can serve as both responsive sensors and compostable, body-worn devices;
(2) A DIY, skin-safe, biodegradable fabrication process based on alginate formulations with embedded anthocyanin;
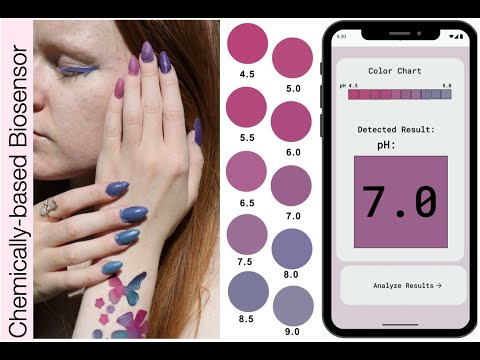
(3) A detection system combining a custom case for light control and a computer vision app that converts RGB color to pH value;
(4) A compostability test of the material under natural conditions.
- Olivia Bates - University of California, Davis, USA
- Alyssa Yee - University of California, Davis, USA
- Emily-Mae McConihe - University of California, Davis, USA
- Phillip Gough - Design lab, School of Architecture, Design and Planning, The University of Sydney, Sydney, NSW, Australia
- Anusha Wishana - School of Computer Science, The University of Sydney, Sydney, NSW, Australia
- Katia Vega - University of California, Davis, USA
This project explores the dual design challenge of creating on-body interfaces that are both environmentally sustainable and capable of on-body chemical sensing. We present a set of single-use cosmetic prototypes—eyeliner, temporary tattoos, and press-on nails—that respond to chemical changes in body and external fluids while being fully compostable after use. Each prototype is fabricated using alginate as a biodegradable substrate and anthocyanin, derived from red cabbage powder, as a colorimetric indicator. We describe the fabrication process and introduce a system that includes a custom- designed case and a computer vision–based mobile application that interprets color changes and outputs corresponding pH values. We report technical evaluations of the materials, system functionality, and compostability. This work contributes to biocosmetic interface design by demonstrating how ephemeral body-worn form factors can simultaneously serve as both responsive chemical sensors and components of a circular materials strategy.
- Eyeliner, Temporary Tattoos, and Press-On Nails: Designed to indicate pH levels through color changes.
- Mobile App: Utilizes a CNN model for pH level detection.
- Data Collection: Includes variations in lighting, camera conditions, and user responses.
- Improved Detection: Shows enhanced pH variation detection over traditional methods.
Required Materials:
- Immersion Blender
- Scale
- Glass Jar - that will fit in the vacuum chamber
- Cameo
- Vacuum Chamber
- Double-sided Sticky Paper
- Disposable Boats (2-3)
- Tracing Paper
- Scissors
- Long Small Spoon
- Calcium Chloride Solution
- Biomaterial
- Spray Bottle
- Plastic spreader or any straight and flat object to be used as such
- Acyrlic Sheet or Metal Oven-safe tray
Calcium Chloride Solution Ingredients:
- 10g calcium chloride
- 100g water
Biomaterial Ingredients: (Measure in Mixing Order)
- 100 g Water
- 0.25 g Red Cabbage Powder
- 0.1 g Titanium Dioxide
- 5 g Glycerine
- 2.5 g Sunflower Oil
- 3 g Sodium Alginate

PROCESS
Overall process:

To Make the Calcium Chloride Solution
- Heat 100g of water until hot, either on the stove or in a kettle
- Stir in 10g of calcium chloride until dissovled
- Pour in a spray bottle and let cool completely
- This solution will be good for a long period of time and does not have to be remade for every batch of biomaterial
To Make the Biomaterial
- Put the glass jar on the scale and hit the zero (tare) button to set the scale to zero
- Measure out 100g of water into the jar
- Measure out the rest of the ingredients as follows, mixing with the spoon inbetween (make sure the spoon is clean each time):
- 0.25 grams of red cabbage powder onto tracing paper, and pour it into the jar
- 0.1 grams of titanium dioxide onto tracing paper, and pour it into the jar
- 2.5 grams of sunflower oil into a boat, and pour it into the jar
- 5 grams of glycerine into a boat, and pour it straight into jar


- The 3 grams of sodium alginate should be measured into a boat and then added slowly to the jar while mixing with the immersion blender
- add very small spoonfulls of the alginate at a time to prevent clumping
- can split the amount into thirds but it is better to add in much smaller portions, such as 10ths, which will create a smoother mixture
- add all the sodium alginate and mix with the immersion blender until fully combined and smooth - use the higher setting as it gets thicker
Using the Vacuum Chamber
- Place the jar (without a lid) in the center of the chamber - try taping it down as it will want to move
- Place the lid of the chamber on and make sure the plug is tight in the back, otherwise it will not pressurize
- Press the "on" button and hit the AI button (on the left of the lid) to change the time unitl it says 15 minutes

- Make sure to watch the solution during this time to ensure that it doesn't bubble over
- if it looks like it will, you can pause the machine with the go/pause symbols
- When complete, depressurize the chamber by releasing the plug very slowly
- Scoop out any remaining clumps and gently stir the solution with the spoon
Pouring and Drying the Biomaterial
- Depending on how you plan to dry the biomaterial gather a flat surface:
- an acyrlic sheet or another smooth non-stick surface if drying in the open air - will take 7 days or 3 warm days in the sun
- a metal tray if drying in the oven/convection oven with a dehydrator setting - will take around 2 hours on a low setting of 120-140 degrees F
- Pour out the entire biomaterial solution onto your desired surface
- Spread out thin with a smoothing tool, not too thin that you can see the surface through the solution
- the biomaterial is self-leveling so some low spots should even out if it is left to sit for a bit, but further spreading may be needed
- Shake or swirl the Calcium Chloride solution to ensure it is fully combined
- From a foot away, douse the biomaterial thoroughly with a fine mist of the Calcium Chloride solution
- Let sit for 5-10 minutes as the material with shrink, exposing the edges which are a lighter and wetter color

- Respray again from 1 foot, focusing on the edges of the biomaterial
- Dry the biomaterial with your chosen method, no part of it should feel wet when done
- Final product should be a face mask consistency, paper-like and smooth
- Peel the biomaterial carefully off of your surface
Cutting the Biomaterial
- Gather a sheet of the double-sided sticky paper
- Cut off a rectangle of the area you will need
- Peel off one side of the paper to reveal the sticker
- Place the biomaterial down and adhere it by pressing down on one side, then working your way to the other
- Stick the sticker paper with the attached biomaterial onto a corner of the sticky cutting mat, paper side down
- make sure to align it to the corner of the grid on the mat and to remove the protective film
- Turn on the machine
- Load the mat into the machine, this can also be done before sending the design
- Connect your computer through bluetooth or a cable connection
- Open up Silhoutte Studio
- There is a pdf file attached above that explains the basics of navigating Silhoutte Studio also
- Import image that you want traced by clicking on the icon that looks like a file whih is called "open"
- To turn this image into an outline, select the trace button from the right hand panel, which opens up a small selection window.
- From there, press "select trace area" and draw a box around the entire image
- Then change the "threshold" slider to make the yellow highlight smooth. Zoom in to check for loss of detail
- Hit "trace" to make the outline
- Repreat these steps on more images or duplicate your outline. Make sure to arrange all outlines so they will only fill the area that your biomaterial occupies on the gridded mat, which can be compared with the gridding in Silhoutte Studio.
- In the "page setup" button from the right panel, make sure the correct machine and media size is selected
- Then hit "send" in the top right corner and adjust settings accordingly:
- For material: select double sided adhesive or a thicker material such as fabric or heavy paper to ensure it cuts through
- Select autoblade
- Raise the force to a higher setting
- Can also do 2 passes to make the sure the design cuts but for intricate designs, only 1 pass should be used
- Set the speed to 3
- Set the blade depth all the way to 10
- Begin cutting
- When the machine is done, unload the mat and peel off your stickers
- Your stickers are ready to be used! Stick sticker on nails, eyes, or anywhere on your arms or legs to read the pH of your environment.


- Mobile Application: Located in the
appfolder.
We welcome contributions to enhance the project. Please fork the repository and submit pull requests with your improvements. For major changes, please open an issue to discuss your proposal before making changes.
This material is based upon work supported by the National Science Foundation under Grant No 2146461, UCD-USyd Ignition Grant, and UC Davis Academic Senate.
This project is licensed under the MIT License - see the LICENSE file for details.
Explore more about our work and stay updated with our research.