2 Methods of unlocking boorloader for the RP3+
Bootloader unlock using CVE-2022-38694 for Retroid Pocket 3+ By following this guide, you acknowledge that you understand the risks involved in unlocking your device's bootloader. Ensure you have backed up all important data before proceeding.
Credits: This bootloader unlocking process is based on the work from the following repository: TomKing062/CVE-2022-38694_unlock_bootloade https://github.com/TomKing062/CVE-2022-38694_unlock_bootloader.
I did this late at night with no sleep and after I stopped recording, going based off of lack of energy memory. I apologize ahead of time
Proceed at your own risk. Unlocking the bootloader will void your warranty and can potentially damage your device. I am not responsible for any damage to your device or any data loss incurred.
Only attempted on Windows systems. Important Notices:
Data Erasure: Unlocking the bootloader will erase all data on your device. Your device will be factory reset to its original state. Unlock Warning: After unlocking, an unlock warning message will appear on the screen every time you boot your device. This is normal and cannot be removed.
- Unlocking Procedure (Attempt 1):
- Unisoc USB Drivers: Install the Unisoc USB drivers located in the UnisocDrivers folder
- ums512_alldocube_iplay_50_EN_20230801 from https://github.com/TomKing062/CVE-2022-38694_unlock_bootloader/releases/tag/1.72
- ADB (Platform Tools) (maybe, I really don't remember but I put it in the extracted ums512_alldocube_iplay_50_EN_20230801 folder and I always go to the adb folder when using it
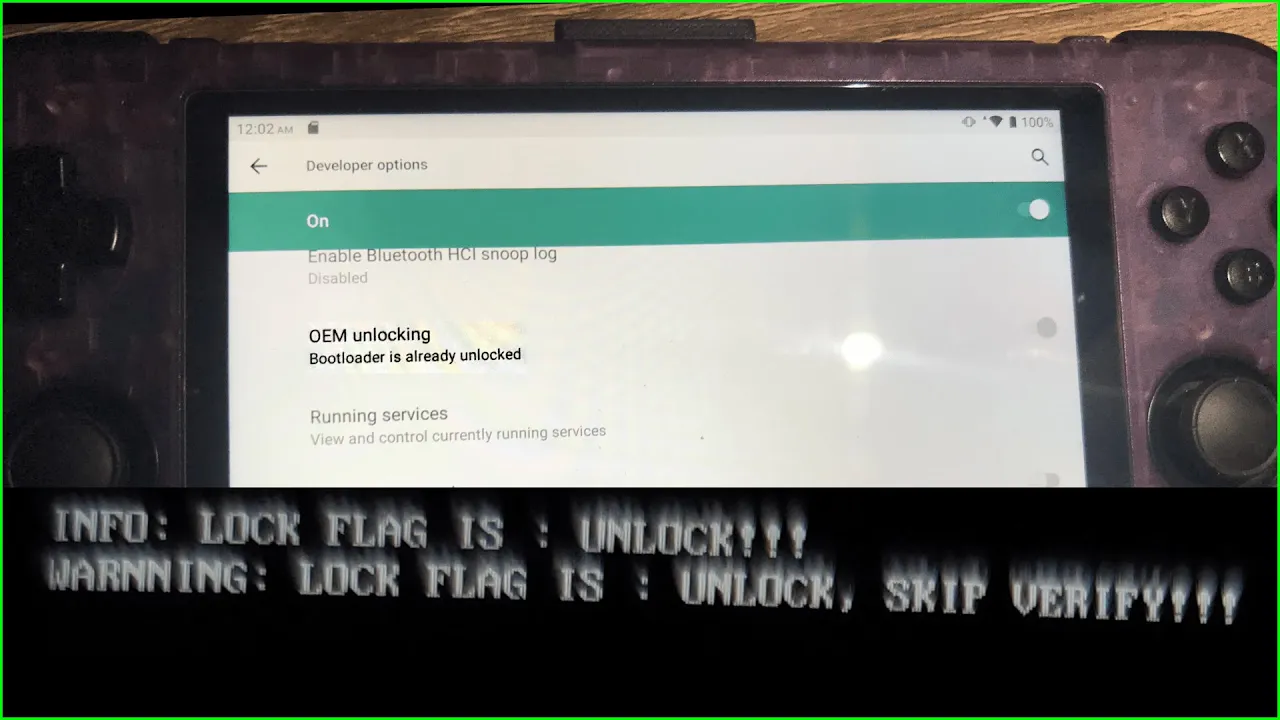
- Enabled developer options on Rp3+ (Go to Settings → About Phone, Tap Build Number 7 times. Then back to Settings → System, Advanced, Developer options. Enable USB Debugging and OEM Unlock in Developer Options
1. Install Unisoc driver, extract adb to the extracted ums512_alldocube_iplay_50_EN_20230801 folder
2.0 Put RP3+ into Android Recovery/Download Mode (Turn off, turn on while holding power along with bottom volume button) while your device is plugged in (You'll hopefully hear it [at least on windows] connect as you turn it on with a black screen in download mode)
2.1 Download Mode work better for me when I reformatted the device with a new .pac file 4/22/2025 https://drive.google.com/drive/folders/1g9m8BlrCsdzXduEUfDERLilVLzxFQxX8
3. Run unlock_autopatch_512.bat from computer, and then enter fastboot on RP3+
4. Follow unlock_autopatch_512 instructions, profit I think. If that doesn't work, have your device plugged in first and then go into Android Recovery.
5. Restart device back to recovery mode, go to "Apply update from ADB" and restart running unlock_autopatch_512.bat from computer, follow those instructions.
6.0 If that doesn't work:
6.1. Restart RP3+ to normal use
6.2. Open cmd from file explorer folder of "ums512_alldocube_iplay_50_EN_20230801"
Type the following:
6.3. adb devices
6.4. adb push fdl1-dl.bin /data/local/tmp/
6.5. adb push fdl2-dl.bin /data/local/tmp/
6.6. unlock_autopatch_512
(https://www.hovatek.com/forum/thread-32287.html)[https://www.hovatek.com/forum/thread-32287.html]
This method must be done in Linux (Done via VirtualBox with Ubuntu distro)
VirtualBox method:
1. Have SPD USB installed on your Windows machine
2. Install VirtualBox and the Ubuntu iso
3. Go to Ubuntu settings and go to USB
3.1 Enable USB Controller
3.2 USB 2.0 (OHCI + EHCI) Controller
3.3 Plug in your device in while on
3.4 Add your device via usb plus symbol (Will show as Unisoc Phone [####])
3.5 Plug in your device in and put into fastboot mode via "adb reboot bootloader" via windows cmd line
3.6 Add your device via usb plus symbol (Spreadtrum fastboot Gadget [####])
4. Login to Ubuntu Distro, download [Hovatek] modified_fastboot file
4.1 Open terminal for that folder
4.2 Run the following:
sudo apt update
sudo apt install android-tools-adb
adb version
echo 'SUBSYSTEM=="usb", ATTR{idVendor}=="1782", ATTR{idProduct}=="4ee0", MODE="0666", GROUP="plugdev"' | sudo tee -a /etc/udev/rules.d/70-android.rules
sudo chmod a+r /etc/udev/rules.d/70-android.rules
sudo udevadm control --reload-rules
sudo udevadm trigger
sudo adb kill-server
sudo adb start-server
SUBSYSTEM=="usb", ATTR{idVendor}=="1782", ATTR{idProduct}=="4ee0", MODE="0666", GROUP="plugdev"
adb devices
adb reboot bootloader
./fastboot devices
./fastboot oem get_identifier_token
4.3 You should get an output like:
Identifier token: XXXXXXXXXXXXXXXXXXXXXXXX OKAY [ 0.019s] finished. total time: 0.019s
4.4 Copy out the Identifier token and replace XXXXXXXXXXXXXXXXXXXXXXXX with your Identifier token with this command:
./signidentifier_unlockbootloader.sh XXXXXXXXXXXXXXXXXXXXXXXX rsa4096_vbmeta.pem signature.bin
4.5 You should have an output like this:
Identifier sign script, ver 0.10 1+0 records in 1+0 records out 50 bytes copied, 0.000257562 s, 194 kB/s Identifier sign successfully
4.6 You will see a signature.bin file in the modified_fastboot folder with it's date modified should be recent to the time you ran the last command
4.7 Now run this command ./fastboot flashing unlock_bootloader signature.bin and you should end with this result: 2downloading 'unlock_message'...
OKAY [ 0.016s] unlocking bootloader... Info:Unlock bootloader success! OKAY [945.463s] finished. total time: 945.479s
The bootloader unlock is required before flashing any custom firmware or custom fixes like
- GammaOS Lite v1.5.1 - Anbernic RG505: Device doesn't install GammaOS after running EraseUserData
- GammaOS v1.5.1 - Anbernic RG505: Device doesn't install GammaOS after running EraseUserData
- GammaOS Core Alternative Flashing Guide using RKDevTool (It's not Rockchip, duh) https://www.youtube.com/watch?v=_-6ZYrNGTRs