Contrubution Guidelines
Streamability is very open to contributions! If you have a feature request, or bug report, please open an issue with the applicable tag. If you would like to simply create a feature, fork the repository and add in your changes. Then submit a pull request which will be reviewed and eventually merged if it meets all contribution requirements.
Use the steps below to clone the repository and get the project running on your local machine.
-
Navigate to the develop branch of the repository and click the green "Code" button. Then copy the repository URL with the method of your choosing. We suggest SSH which can be setup be following these docs.
-
Go to your terminal program of choice and navigate the the folder you want the project to live in. Then run the command below to clone the repository:
git clone <repository_url>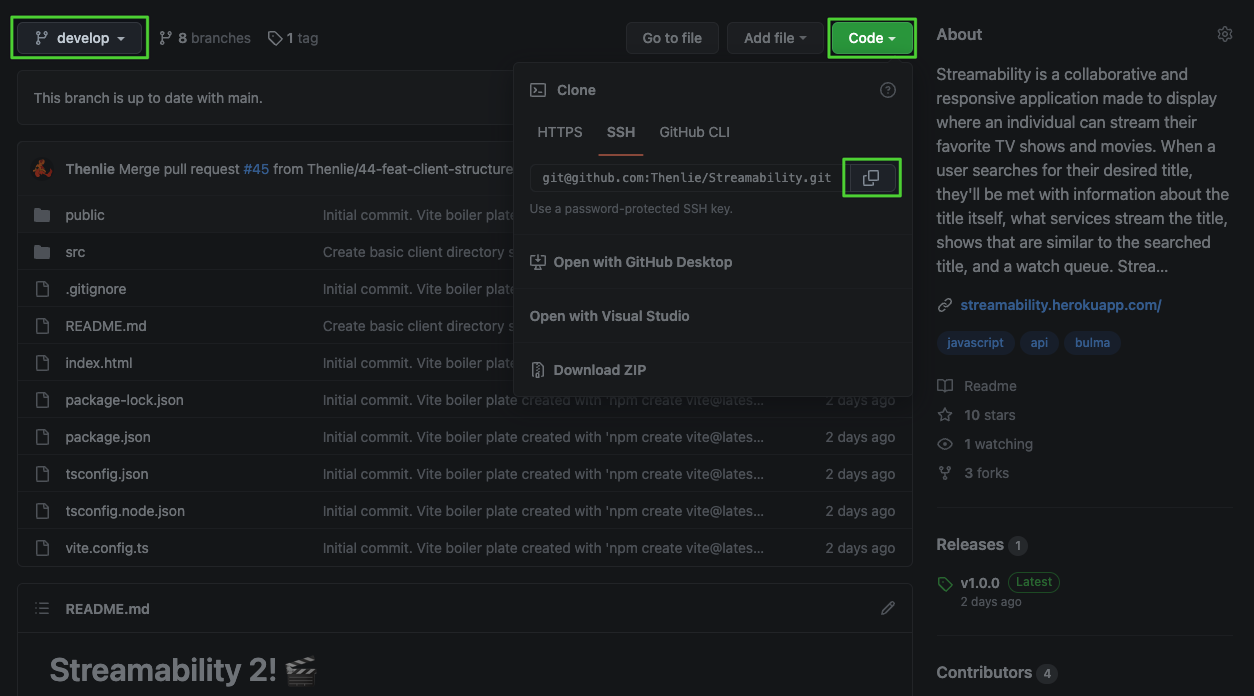
-
Now that the repository is cloned you can navigate into it with the command
cd <project_name>. -
Once you are in the project you will need to install the node modules with the command:
npm install- Next, you need to run the set up command:
npm run setup- The last thing to do is create a
.envfile in the root of the project. You can use the.env.templatefor the general structure of the file. Please reach out to one of the developers for the actual keys.
To run the development server, use the command:
npm run devThis will build and run the application in watch mode automatically. This means as you work on the application, your browser will automatically update when you save the code.
If you would like to see a deployed version of your work, push your branch to remote. Vercel will automatically deploy that branch in a test site.
When creating branches, be sure to use the proper naming convention. Each item should by hyphen separated and lowercase.
- Issue number. If no issue,
NA-0 - Issue type. If no issue, pick the most suitable type.
- Description.
Example:
13-feat-show-card
Streamability V2 is attempting to have a linear commit history on main as well as develop. You can read more about the benefits of linear commit histories here.
Creating and pushing a new feature branch is quite simple. Follow the steps below:
- Checkout to
developand pull the most recent changes.
git pull origin develop- Create a new feature branch using the proper naming convention.
git checkout -b "issue-num"-"issue-type"-"branch-name"NOTE: If you do not have an issue number or type,
NA-0, should be used instead followed by the branch name.The branch name is whatever the developer thinks fits best but should be descriptive, lowercase, and hyphen separated.
- Add your changes to the branch and create a new commit. The commit should contain a descriptive message of the changes or additions you have made. It is also a good idea to run an es-lint check first.
npm run lint
git add -A
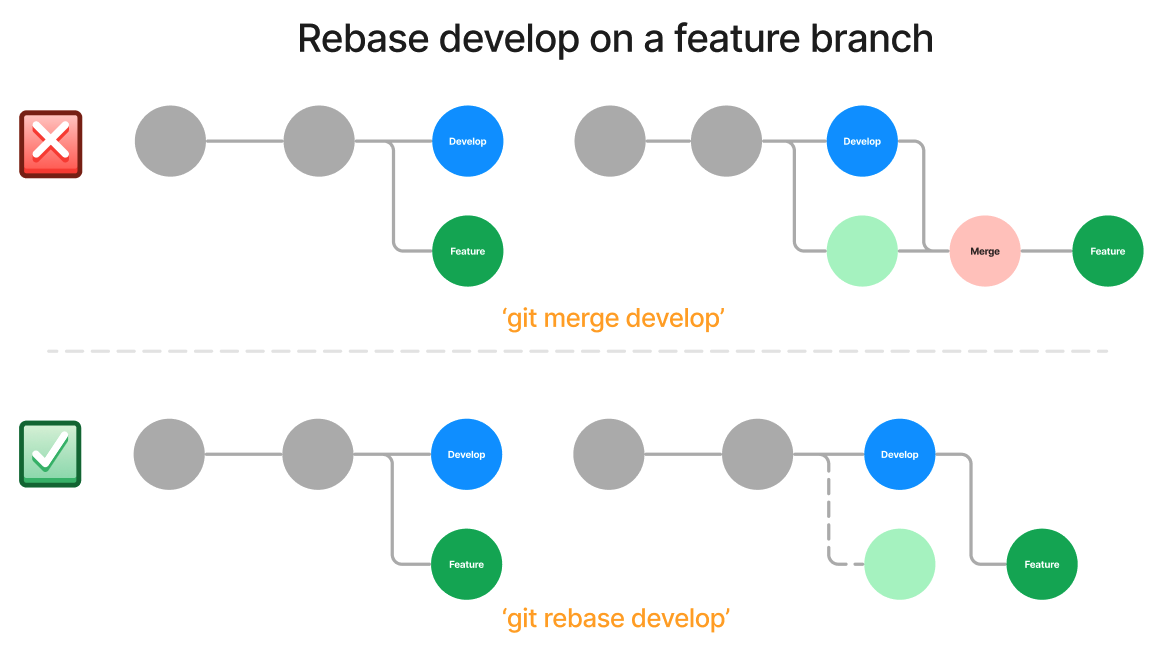
git commit -m "descriptive message"One common issue when learning to work with linear histories is avoiding merge commits. As an example, if you are on
featureand another developer merges a pull request todevelop, using the commandgit merge developwill create a merge commit on the feature branch log. Assuming the code added to develop is unrelated to the feature,this is an unnecessary commit on the feature branch. To avoid this,git rebase developshould be used instead.
- Push your branch to the remote repository
git push origin branch-nameNOTE: This assumes you named the remote
origin.
- If you need to make changes to your code after the PR review, you can do so and add, then commit as normal. After you have done this use an interactive rebase to squash the commits into as few as possible. You will then need to force push your branch back to the remote.
git rebase -i HEAD~2
...
git push -f origin branch-name
NOTE:
HEAD~2would pick the current HEAD and on commit previous for the rebase. Change this number as needed depending on the number of commits you have. You can read more about rebasing here.
In order to make it easier for lots of people to contribute to the project, we want to maintain a high standard of code. To help achieve this, ES Lint has been set up in the project. It has also been added to an automation that will run on each PR. Your PR will be blocked if the lint check fails, so be sure not run lint check locally before pushing. To do this, use the commands below.
Run lint check, returns errors and warnings:
npm run lintRun lint check and fix any errors it can:
npm run lint-fixThe easiest way to check for typescript issues is to run the command npm run watch. This will run the TypeScript compiler in watch mode so errors and warning will automatically update on save.
ES Lint will throw warnings for implicit use of the any type. This should be avoided whenever possible, but can also be ignored with an es-lint flag.
TypeScript also has a standardized comment syntax that should be followed for primary components/functions.
Console logs should generally not be left in the code. If they do need to exist, please use an environment flag.
import.meta.env.DEVNOTE: Switch out
DEVwithPRODif you need something to only work in production
This project features a Vitest testing suite. All tests will need to pass in order for PR's to main or develop to be unblocked. You can run these tests locally with the command below:
npm testTo run the tests in watch mode, use this command:
npm test -- -wTo run a single test:
npm test <test-name>