This is the main software repository for the Open-Hardware project (RaspyControl Lab). This laboratory is an initiative to build open-hardware experiments in automatic control available for everyone. Follow the instructions to build the software of RaspyControlLab.
Please, click on the following videos to see some testing examples of the Remote Laboratory RaspyControlLab.

- Download 32-bit Raspberry Pi OS with the recommended software from the webpage: https://downloads.raspberrypi.org/raspios_full_armhf/images/raspios_full_armhf-2022-04-07/2022-04-04-raspios-bullseye-armhf-full.img.xz
- Use the software Raspberry Pi Imager to write this image on a micro sd card.
- Take into account that in RaspyControl Lab, we used a Raspberry Pi 4 with RAM of 4GB. Also, a model with 2GB is enough for the software requirements.
- Enable the following interfaces: Camera, VNC, SSH, I2C,SPI of your Raspberry Pi. Use the command sudo raspi-config from a terminal or enter the Raspberry Pi configuration in your Raspberry Pi OS. Please, check the camera using the commands Raspistill or Raspivid from a terminal in the Raspberry Pi OS.
- A web browser (Chrome, Firefox, etc.) with WebRTC standard support. Please check this page to identify the minimum version: https://caniuse.com/?search=webrtc
- Install Janus WebRTC server. This server allows real-time video for the laboratory. Run these commands from a terminal in the Raspberry Pi.
sudo apt-get update
sudo apt-get upgrade
sudo apt-get install libmicrohttpd-dev libjansson-dev     libnice-dev libssl-dev libsrtp-dev libsrtp2-dev libsofia-sip-ua-dev     libglib2.0-dev libopus-dev libogg-dev libini-config-dev     libcollection-dev pkg-config gengetopt libtool automake dh-autoreconf
cd ~
mkdir janus && cd janus
git clone https://github.com/meetecho/janus-gateway.git
cd janus-gateway
sudo apt-get install libconfig-dev
sh autogen.sh
./configure --disable-websockets --disable-data-channels \
--disable-rabbitmq --disable-docs --disable-mqtt --prefix=/opt/janus
make
sudo make install
sudo make configs
-Edit the file janus.plugin.streaming.jcfg with the contents available in the folder Janus in this repository. Use the following command for that:
sudo nano opt/janus/etc/janus/janus.plugin.streaming.jcfg
- Install an Apache2 server in your Raspberry Pi and copy the janus html files
sudo apt install apache2 -y
sudo cp -r /home/pi/janus/janus-gateway/html /var/www/janus
-Edit the file 000-default.conf of Apache2 in your Raspberry Pi with the content of the file 000-default.conf (https://github.com/Uniminutoarduino/RaspyControlLab/blob/main/Apache2/000-default.conf) in the folder (Apache2) of this repository
sudo nano /etc/apache2/sites-available/000-default.conf
-Enable the proxy mode in the Apache2 server
sudo a2enmod proxy
sudo a2enmod proxy_http
sudo service apache2 restart
- Change the permissions of the folder /var/www to write files in it.
sudo chown -R pi:www-data /var/www
sudo chmod u+rxw,g+rx-w,o-rwx /var/www
sudo chmod 777 /var/www/FlaskApp -R
sudo chmod -R g+w /var/www/FlaskApp
sudo chown -R www-data:www-data /var/www/FlaskApp
sudo service apache2 restart
-Edit the sudoers file
sudo nano /etc/sudoers
(search for these lines and modify them as follows:)
%sudo   ALL=(ALL:ALL) ALL
www-data ALL= NOPASSWD: ALL
-Restart Apache2 service
sudo service apache2 restart
- Copy the RaspycontrolLab Apache 2 configuration file called "FlaskApp.conf" available in the folder Apache 2 in this repository to the location /etc/apache2/sites-available
sudo cp FlaskApp.conf /etc/apache2/sites-available
- Copy all contents of the folder FlaskApp available in the folder Apache 2 in this repository inside the location /var/www. Because the file permissions are enabled to write files in the folder /var/www, you can use a simple copy and paste, or use the following commands.
sudo cp -R FlaskApp /var/www
- Install and enable the WSGI mode. RaspyControl Lab uses this mode to interact with Python language.
sudo apt-get install python3-pip apache2 libapache2-mod-wsgi-py3
sudo a2enmod wsgi
sudo a2enmod headers
sudo a2enmod rewrite
sudo service apache2 restart
- Enable the site "FlaskApp" in Apache
sudo aen2site FlaskApp
sudo service apache2 restart
- Start the Janus WebRTC server. Send a video stream using the tool ffmpeg. Take in mind that the video port, in this case, is the 5004, and the video rate is 200Kb/sec. By default ffmpeg comes in the distribution software of your Raspberry Pi OS.
/opt/janus/bin/janus -F /opt/janus/etc/janus/
sudo raspivid -t 0 -w 680 -h 480 -fps 20 -g 75 -b 200000 -n -rot 90 -o - | ffmpeg  -i - -c:v copy -r 20 -bsf dump_extra -maxrate 100K -bufsize 80K -tune zerolatency -f rtp rtp://127.0.0.1:5004?pkt_size=1300
-
Open a browser (Google Chrome or Mozilla Firefox) and type the IP of the Raspberry Pi. You should see the real-time video of the experiment and the web interface for it.
-
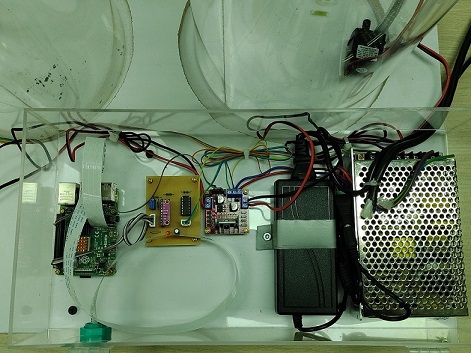
Copy the folder HardwareX and paste it into your Desktop folder in the Raspberry Pi. Go to the file rc.local and edit it with the contents of the file ("rc.local") provided in this repository.
sudo nano /etc/rc.local
In this folder, you will find the bash scripts to start the video streaming, the Janus WebRTC server, and the node.js to the real-time plotter.
- If you want to change the video rate, go to the file "startbashffmpeg.sh".
- If you want the start process of Janus, go to the file startbashjanus.sh.
- Finally, if you want to change the access to the plotter employing node.js and Redis, go to the files "startbashnode.sh" and "servidorwsHX.js".
- Reboot your Raspberry Pi.
reboot
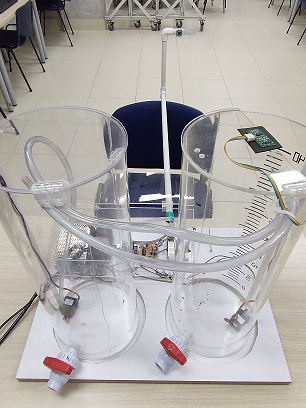
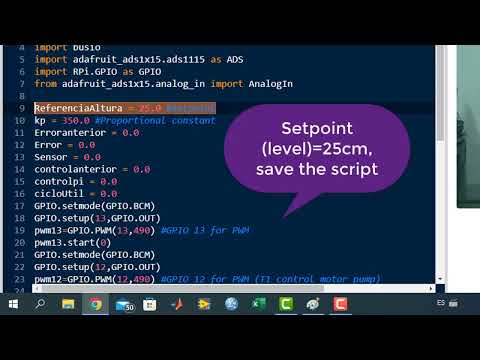
- Install the Python library to manage the 16-bit ADC (ADS1115). This ADC will read the values of the level from the ultrasonic sensor (US-016).
sudo apt-get install build-essential python-dev python-smbus
sudo pip3 install adafruit-circuitpython-ads1x15
sudo pip install adafruit-circuitpython-ads1x15
- To plot data in real-time from the experiment, we need to install node.js and a Redis database. For that, the steps are:
- Check the system architecture version of your Raspberry Pi
uname -m
- Get the node.js version for your system architecture. The version must be above 12.0.
cd
wget https://nodejs.org/dist/v16.15.1/node-v16.15.1-linux-armv7l.tar.xz
- Install node.js
tar -xzf node-v16.15.1-linux-armv7l.tar.xz
cd /home/pi/node-v16.15.1-linux-armv7l
sudo cp -R * /usr/local
reboot
- If the installation is ready, check the versions of node and npm
node -v
npm -v
- Install the node.js packages needed to plot data
sudo npm install ws
sudo npm install redis
sudo npm install fs
- Install the Redis database server
sudo apt install redis-server
redis-server –version
redis-cli
-- Edit the Redis server configuration
sudo nano /etc/redis/redis.conf
-- Search and put these lines in the redis.conf file
#bind 127.0.0.1::1
Bind 0.0.0.0
-- Install the Python Redis client
sudo pip3 install redis
The files to start the node.js server and the webpage for the plotter are available in the HardwareX folder and in the location /var/www/FlaskApp/templates/plot.html. Please, see these files.
- To plot data, we created a small library with Redis support known as plotter. This library is inside the folder /var/www/FlaskApp
- Import the library
import plotter as plot #Library to plot data
- You can use any of the following functions as you desire. Take into account that data must be in form of string. Therefore, we employed the method str to transform numeric data in string.
plot.1m(str(sensor)) #Plot a sample of one sensor, controller, etc.
plot.2m(str(sensor),str(sensor2)) #Plot two samples of sensors, controller, etc.
#Plot three samples of sensors, controller, etc.
plot.3m(str(sensor),str(sensor2),str(sensor3))
- Open a browser (Google Chrome or Mozilla Firefox) and type the IP of the Raspberry Pi. You should see the real-time video of the experiment and the web interface for it. Test the experiment and the plotter. See the following videos if you have any doubt.
- PI Controller: https://youtu.be/mceNmW32gA0
- PI Controller with plotter: https://youtu.be/ifcukqjerqE
- Full test (Record of laboratory functioning): https://youtu.be/Vvyo_BSJTMU
-
To redirect the Python console to the web interface, we created a bash script "EjemploBash.sh" which can be located in the folder /var/www/FlaskApp. Besides, each time that a Python script arrives on the Raspberry Pi, a bash script ("EjemploBashRestart.sh") restarts the current script that is being executed. This bash script is located in the folder /var/www/FlaskApp.
-
Be aware of the configuration settings of VNCViewer. For instance, when you use an external monitor or Raspberry Pi touchscreen in the MIPI DSI display port, VNCViewer will show a black screen. In this case, install Putty and enter to the Raspberry Pi with the IP assigned to it in your network (user:pi, pass:remotelab, port: 22). In the Raspberry Pi console, put the following commands:
sudo nano /boot/config.txt
In this file, uncomment the following lines:
hdmi_safe=1
framebuffer_width=1280
framebuffer_height=720
Just press ctrl+o to save the file. Next, press ctrl+x to get out of this file. Next, type in the console:
sudo reboot
This will reboot your Raspberry Pi. These changes should resolve the problem.
- Use the Python scripts available in the folder --Scripts-- to interact with the experiment. The scripts are the following:
- fill_tank.py: script to fill the main tank (T1) of the experiment and interact with the motor pumps in each tank (T1-T2).
- PController.py: script for Proportional (P) controller.
- PIController.py: script for Proportional-Integral (PI) controller.
- PIControllerwPlot.py: script for Proportional-Integral (PI) controller with plot option in the remote laboratory.
- PIDController.py: script for PID controller.