This repository implements Proximal Policy Optimization for the OpenAI CarRacing-v0 environment using an architecture based on CoordConv layers, since in the original paper they applied it to several Reinforcement Learning Atari environments with some success.
- The PPO algorithm is a revision from what was shown in https://github.com/xtma/pytorch_car_caring. I use a simmilar two-headed structure for the output of the network that returns:
- The (alpha beta) parameters for generating a beta distribution for sampling the value for each of the three actions (turn, speed, brake).
- The state value for the update while training the model.
- For the architecture of the net I reduced the input image size from 96x96 to 48x48 and the number of convolutional layers from 6 to 4. In order to regain the accuracy lost by simplifying the model and the input size I've modified the architecture for using CoordConv layers instead of regular convolutional layers. My main reference was this implementation: https://github.com/walsvid/CoordConv
The final architecture looks like this:

Here you can see a run once the model is trained:

The repository is not dockerized since I experienced many issues while executing OpenAI render functions in a container due to its lack of display, as detailed here: https://stackoverflow.com/questions/40195740/how-to-run-openai-gym-render-over-a-server. The problem is that CarRacing environment calls the render function inside its step function since the state is the image and it has to build it, so this call is not avoidable. I've tried many proposed solutions like redirecting the display, using a wrapper or modifying the original OpenAI environment but none of them worked.
In the source folder of the project you'll find the requirements:
pip3 install -r requirements.txt
Then you can run the training script. It accepts also the --render argument if you want to check the live performance:
python3 src/train.py --model coordconvnet
Allowed models are:
- convnet: 6 layer Convolutional Network, as in https://github.com/xtma/pytorch_car_caring using 96x96 images as the input
- coordconvnet: 4 layer CoordConvolutional Network, using 48x48 images as described in the summary.
This generates a model-name_date.pt model in the models folder and a model-name_date.csv and a model-name_date.png in the results/individual folder with the training performance. This is used later for comparing the models.
Once the training is done you can execute the test script. Make sure that you use the correct model name, models are generated and stored in the models folder. Now the action selection is deterministic, it returns always the maximum of the beta distribution returned by the net for each action, so you may expect an increase in performance with respect to the training rewards. You don't need to add the extension, only the name of the file. I provide some models in case you don't want to train your own:
python3 src/test.py --model-name convnet_2021-12-13--21:50:29 --render --episodes 10 --sleep-time 0.1
There you can evaluate the performance of the model with a greedy policy over n episodes (default 100) and visualize the results if you choose the --render argument, with the --sleep-time argument for modifying the time step between renders (default 0).
Finally, you can execute the visualization script. This generates model comparisons among all the models in the models folder over time and episode number, averaging the results with the standard deviation as the error bar:
python3 src/visualize.py --model-name convnet_2021-12-13--21:50:29
These visualizations are saved in results/comparison folder. You don't need to pass the --model-name argument, but if you do it will also use that model for some test runs, saving them as gifs with also some examples of the beta functions that chose the actions in every step, saving them in results/samples.
There's also a quick test you can run if you decide to make changes in the architectures. It basically checks that the state returned by the environment fits properly in the architecture of the agent's policy network defined for every model implemented:
python3 src/network_architecture_testing.py
This the comparison between models I was talking above:

These are averaged over 5 runs for each type of model. We can see that the performance by episode is a bit lower in the CoordConvolutional model at the beginning but after that it experiences a less erratic behavior than the baseline model. This last one is quite unpredictable, in 2 of the 5 runs it started loosing performance until it almost reached an averaged reward over the last 100 episodes of zero by the end of the 2000 episodes. This volatile behavior appears also in the CoordConvolutional model but with a smaller impact, I think this is because being a smaller model makes it less prone to overfitting. Some other implementations (including the one I took as baseline) prevent this effect and make the training more robust by modifying the rewards returned by the environment, for example including a penalty if the car is in the grass, removing the dying penalty or adding a bonus if it's going at maximum speed. I rejected this approach because I wanted to establish a comparison between models as independent of the environment as possible so the conclusions can be applied to different problems.
If we check the averaged reward by time instead of by episode the CoordConvolutional model outperforms clearly the baseline, since it takes half the time than the baseline for each episode.

Now we can check the behavior of the model for some particular situations. The output of the network for the action selection is the parameters (alpha, beta) for a beta distribution for evey action (turn, gas, brake). These are some images generated by the visualization script for the best version of the model:
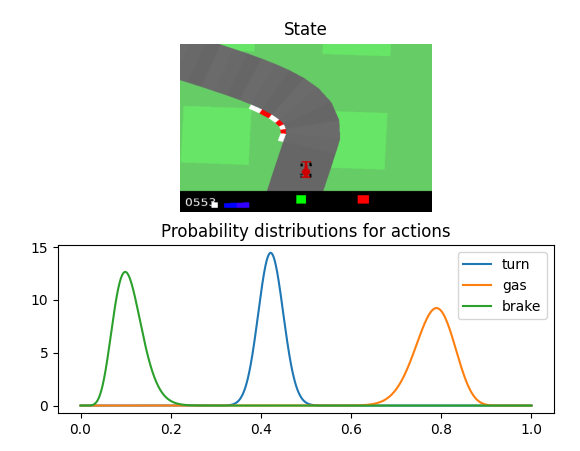


It is quite interesting how the brake distribution only shifts to the right slightly in the closest turns or when the car is about to exit the road, while the rest of the time it is really narrow around an almost zero value. The model is also quite conservative in its turns, never deviating much from the center of the axis. The gas action remains quite constant over all the situations.