A HACS-compatible Home Assistant integration for CallAttendantNext — a landline telephone call-screening application that uses a USB modem to identify, screen, and block unwanted calls.
This integration subscribes to MQTT call events published by CallAttendantNext, stores a persistent call history, exposes sensors for automations, and includes a built-in Lovelace card to browse your call history directly from your dashboard.
- Last Call sensor — state is
Permitted,Screened, orBlocked; attributes include caller name, number, timestamp, reason, and voicemail filename - Weekly count sensors — separate sensors for total, permitted, screened, and blocked calls in the past 7 days; useful for dashboard statistics and automations
- Persistent call history — up to 500 calls stored across Home Assistant restarts (limit is configurable)
- Logbook integration — every call appears in the HA logbook as a human-readable entry (e.g. Blocked: SPAM CALLER (8005551234) — Nomorobo: Robocall)
- Lovelace history card — live last-call panel with paginated history, color-coded action badges, and inline voicemail playback; auto-injected on startup with no manual resource configuration required
- Home Assistant 2024.1 or later
- HACS installed
- The MQTT integration set up in Home Assistant and connected to your broker
- CallAttendantNext running with MQTT notifications enabled (see CallAttendantNext Setup below)
- Open HACS in Home Assistant
- Go to Integrations
- Click the ⋮ menu (top right) and select Custom repositories
- Enter the repository URL and set the category to Integration:
https://github.com/foureight84/CallAttendantNext_Monitor - Click Add, then close the dialog
- Search for CallAttendantNext Monitor in the HACS integrations list and click Download
- Restart Home Assistant
-
Go to Settings → Integrations
-
Click + Add Integration
-
Search for CallAttendantNext Monitor
-
Fill in the configuration form:
Field Default Description MQTT Topic callattendant/callMust match the topic CallAttendantNext publishes to (see below) History Limit 500Maximum number of calls to keep stored (10–5000) -
Click Submit
The Lovelace card is automatically injected into the frontend on startup — no Lovelace resource configuration needed. If the card does not appear after a restart and hard-refresh, see Card not appearing in card picker in the Troubleshooting section.
In your CallAttendantNext web UI, go to Settings and find the MQTT Notifications section. Configure the following fields:
| Setting | Value | Notes |
|---|---|---|
| Enable MQTT notifications | On | Must be enabled for any messages to be sent |
| Broker URL | mqtt://your-broker:1883 |
Use mqtt:// for plain or mqtts:// for TLS. If your broker is Home Assistant's built-in Mosquitto add-on, use mqtt://homeassistant.local:1883 |
| Username | (optional) | Only required if your broker uses authentication |
| Password | (optional) | Only required if your broker uses authentication |
| Topic prefix | callattendant |
This integration expects the topic callattendant/call — leave this as the default callattendant |
| Notify on: Voicemail received | On | Publishes when a screened or permitted caller leaves a voicemail |
| Notify on: Blocked call | On | Publishes when a call is blocked |
| Notify on: All calls | On | Recommended — ensures every call (permitted, screened, and blocked) is sent to this integration |
Tip: Enable All calls to get complete history. If you only enable individual filters, calls that don't match will not appear in the integration's history or weekly counts.
After saving, click Test connection to verify the broker is reachable and a test message is published.
- Open any dashboard in edit mode
- Click + Add Card
- Search for CallAttendantNext Monitor in the card picker, or choose Manual and paste:
type: custom:callattendantnext-monitor-card
title: "Phone Calls"                                               # optional
page_size: 10                                                      # optional
voicemail_base_url: "http://callattendantnext.local:3000/api/audio" # optional| Option | Default | Description |
|---|---|---|
title |
CallAttendantNext Monitor |
Card header title |
page_size |
10 |
Calls per page (1–100) |
voicemail_base_url |
(none) | Base URL for voicemail audio files served by CallAttendantNext. When set, voicemail indicators become buttons that expand an inline audio player. The card constructs the full URL as {voicemail_base_url}/{filename}. Use your CallAttendantNext host and port — the audio endpoint is /api/audio, e.g. http://callattendantnext.local:3000/api/audio |
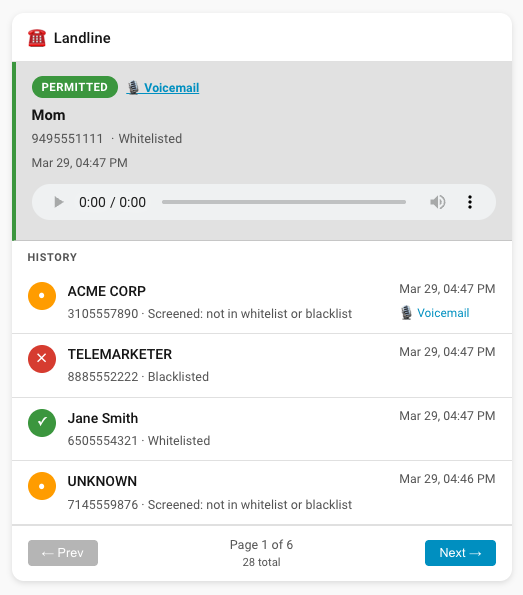
The card shows calls newest-first with:
- A live last-call panel at the top (updates automatically when a new call arrives)
- Color-coded badge: green for Permitted, orange for Screened, red for Blocked
- Caller name, number, timestamp, and reason
- Inline voicemail player — when
voicemail_base_urlis configured, clicking "🎙 Voicemail" expands an audio player directly in the card; clicking again collapses it
| Entity | State | Description |
|---|---|---|
sensor.callattendantnext_monitor_last_call |
Permitted / Screened / Blocked |
Most recent call; attributes include name, number, timestamp, reason, voicemail |
sensor.callattendantnext_monitor_total_calls_week |
integer | All calls received in the past 7 days |
sensor.callattendantnext_monitor_permitted_calls_week |
integer | Permitted calls in the past 7 days |
sensor.callattendantnext_monitor_screened_calls_week |
integer | Screened calls in the past 7 days |
sensor.callattendantnext_monitor_blocked_calls_week |
integer | Blocked calls in the past 7 days |
Weekly counts are calculated from stored history and start accumulating from the date the integration is installed.
To change the MQTT topic or history limit after initial setup:
Settings → Integrations → CallAttendantNext Monitor → Configure
Changing the topic will reload the integration and re-subscribe to the new topic immediately.
CallAttendantNext publishes the following JSON structure to {topic_prefix}/call:
{
  "action": "Blocked",
  "name": "SPAM CALLER",
  "number": "8005551234",
  "timestamp": "2026-03-28T17:30:00.000Z",
  "reason": "Nomorobo: Robocall",
  "voicemail": "msg_20260328_173000.mp3"
}
voicemail is only present when a voicemail was recorded.
No calls appearing:
- Confirm MQTT is enabled in CallAttendantNext Settings
- Check that the Topic prefix in CallAttendantNext matches the MQTT Topic set in this integration (default is
callattendant→ topiccallattendant/call) - Use the Test connection button in CallAttendantNext to verify the broker is reachable
- Check that Notify on: All calls is enabled — without it, only voicemail or blocked calls are published
Sensors show unavailable:
- Ensure the MQTT integration in Home Assistant is configured and connected
- Restart Home Assistant after installing the integration
Card not appearing in card picker:
- Restart Home Assistant, then hard-refresh your browser (
Cmd+Shift+Ron Mac /Ctrl+Shift+Ron Windows) - The integration attempts to auto-register the card resource on startup. If it succeeds, no manual steps are needed
- If auto-registration fails, a persistent notification will appear in Home Assistant with step-by-step instructions to register it manually — check the notification bell in the HA sidebar
- To register manually: go to Settings → Dashboards → ⋮ → Resources, click + Add Resource, set the URL to
/local/callattendantnext-monitor-card.jsand type toJavaScript Module, then hard-refresh your browser - This only needs to be done once per installation