This project aims to provide fully functional VDI solution by using open source virtualization.
NOTICE: KVM-VDI versions prior to 2016/06/01
Older versions are no longer compatible with new release! Older versions need to be manually upgraded to a new db schema from sql/vdi.sql file
Also you must edit you VM to change to the new KVM wrapper script:
/usr/local/VDI/vdi-xmledit -name yourvmname
"KVM-VDI" consists of three parts:
- Dashboard. A webservice, which provides virtual machine control.
- Thin client. A collection of scripts (thin_clients directory), which are run from thin client side (must be copied /usr/local/bin on thin client).
- Hypervisor. A collection of scripts (hypervisors directory) which are used at hypervisor side (must be copied to /usr/local/VDI on hypervisor).
Project uses qemu-kvm virtualization and provides VMs to thin client via SPICE protocol. Additionally dashboard can provide thin client with a RDP session of remote machine, or a VM from vmWare Horizon VDI pool (if used). - These options are optional and are designed as a quick failover solution when KVM hypervisors are not available (maintenance etc.).
Basic architecture would look like this:
- Thin clients are booted from a network (or local storage for that matter). /usr/local/bin/vdi_init application should be run on system startup. I suggest using systemd for that. (systemd config file is provided in thin_clients directory).
- Hypervisors should have a user account with sudo nopasswd rights (see hypervisors/sudoers) file.
- Dashboard web service should be able to ssh to hypervisors via 'username' using RSA public/private keys.
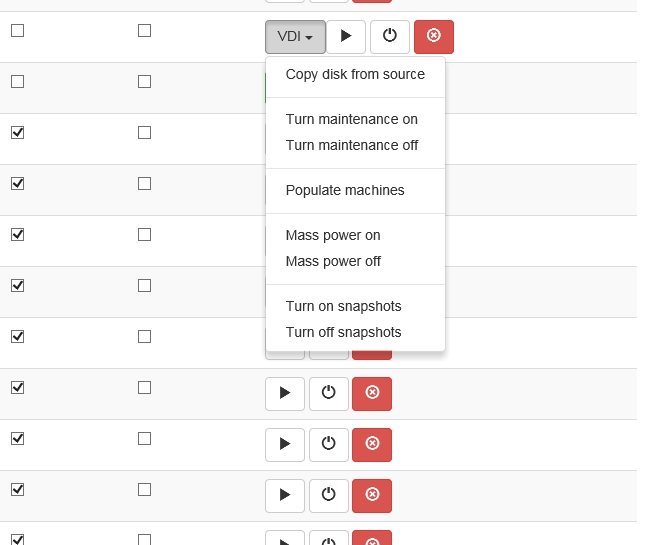
Dashboard service has four types of virtual machines:
-
Simple machine - a standard VM, which is not connected with VDI service in any way.
-
Source machine - a VM, which is used as source image - the "Initial machine" will be run from the copy of it's drive image.
-
Initial machine - a VM, which will provide a bootable source for VDI VMs.
-
VDI - a virtual machine, which runs from "Initial machine's" disk image. All changes are written to it's snapshot drive, or virtual snapshot (if enabled).
-
Virtual snapshot - if marked, VM will write disk changes to a temporary location (defined in hypervisor's kvm-snap file). After machine is shut down (or rebooted, depending on its libvirt configuration), snapshot will be deleted.
-
Maintenance - if marked, VM will not be provided to thin client.
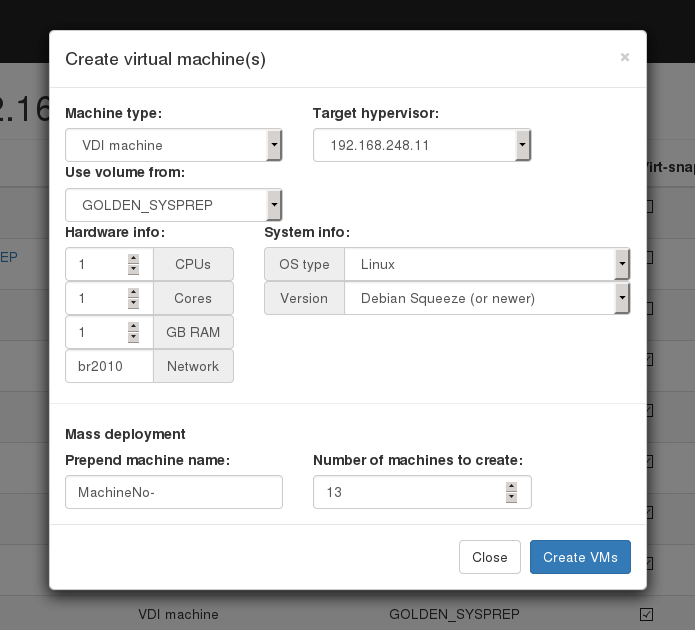
To provide a VDI enviroment you should take folowing steps: Create a "Source machine" and install a guest operating system to it. Create required number of VDI machines. Copy "Source machine's" disk image to "Initial machine's" disk image ("Copy disk from source" button). Create snapshots for all VDI VM's from "Initial machine's" disk image ("Populate machines" button); Configure "clients.xml" file, to provide thin clients with it's own VDI VM.
On Debian based systems:
Note: you can use mysql server instead of Maria-db
Ubuntu 16
apt-get install mariadb-server apache2 php git libapache2-mod-php php-mbstring php-gettext php-ssh2 php-imagick php-mysql
Debian, Ubuntu 15 and earlier.
apt-get install mariadb-server apache2 php5 git libapache2-mod-php5 php-gettext php5-ssh2 php5-imagick php5-mysql
Create empty database/user on db server.
cd /var/www/html/
git clone https://github.com/Seitanas/kvm-vdi
cd kvm-vdi
Rename functions/config.php_dist to functions/config.php Edit config.php to fit your needs.
Change permissions on tmp/ folder and functions/clients.xml file to give webserver writeable rights.
Go to http://yourservename/kvm-vdi
If installation is successful, you will be redirected to login page. Default credentials are: admin/password
On Debian based systems:
apt-get install qemu-kvm libvirt-bin sudo python python-requests virtinst
NOTICE: Ubuntu apparmor!
You must disable apparmor feature on hypervisors.
Failing to do so will disable "virtual snapshots" capabilities. And won't allow VMs to start
service apparmor stop
update-rc.d -f apparmor remove
apt-get remove apparmor apparmor-utils
reboot
On dashboard servers and hypervisors create VDI user:
useradd -s /bin/bash -m VDI
On dashboard server type:
su VDI
cd
ssh-keygen -t rsa
copy files from /home/VDI/.ssh to /var/hyper_keys folder. copy rsa.pub file from dashboard /var/hyper_keys folder to each of hypervisors /home/VDI/.ssh/authorized_keys file. To check if everything works, from dashboard server type:
ssh -i /var/hyper_keys/id_rsa VDI@hypervisor_address
If passwordless connection is established, everythin is fine.
On each hypervisor create /usr/local/VDI folder. Copy all files from "hypervisors/" folder to /usr/local/VDI/ folder.
Edit config file accordingly.
Edit your /etc/sudoers file according to examlpe of hypervisors/sudeors file.
On Debian based systems:
apt-get xdotool x11-utils xwit python python-requests virt-viewer freerdp-x11 pulseaudio xinit
Download and install vmware-view viewer from VMware if needed.
Copy files from thin_clients/ folder to your clients /usr/local/VDI-client/ folder.
Edit /usr/local/VDI-client/config file to fit your configuration.
If you are using plain thin-clients (without x-window manager), you can use systemd for VDI client startup. Copy vdi init script from thin_clients/ folder to systemd script folder:
cp thin_clients/vdi.service /etc/systemd/system/
systemctl daemon-reload
If thin-clients do use some kind of x-window manager, run /usr/local/VDI-client/vdi application manually from window manager itself.
Edit clients.xml file in your dashboard, specify IP address of your thin client, protocol and name of VDI machine it will use.
Start vdi service:
systemctl start vdi
You should see VDI machine powering up and your thin client displaying VMs monitor output.
Source machine:
Install your favourite OS, which you will use for VDI population. Install all the software you need. Update.
Shutdown "source machine".
Initial machine:
Create "initial machine" out of "source machine". Use "disk from source". Power on "initial machine".
At this point we use sysprep to depersonalise machine - we remove machine name, ip adresses, etc. If it's MS Windows VM, we use script, that will start on next machine bootup, name machine, reboot, add machine to active directory, shutdown (remember, that after VMs are populated,they are booted without "virtual snapshots" turned on, so configuration will persist). If it's Linux machine, you can provide its name via DHCP. After VMs are shut down, turn on "virtual snapshots", disable "maintenance mode". From this point each time VM is shut down (or rebooted, if libvirt configuration states that), next boot of VM will have its state cleared and you will have clean machine online. Also from this point thin clients can start their VMs.
Antivirus/live updates
You should disable them both. Since machine disk state is cleared each time it is destroyed (shut down/reboot), updates will be re-downloaded and will consume snapshot space for any use. Updates must be done on "source machine", then "initial machine" must copy "disk from source", then you should run sysprep, populate VDI machines and so on.
Also you can use network-based antivirus software, which offloads scanning to external network server and does not use local db. For example http://www.bitdefender.com/business/virtualization-security.html
Hardware
Our thin clients
Most of remote display protocols require significant CPU time. This is because they do not utilise client's GPU.
Our production environment uses Intel NUC diskless clients with Intel i3 processors (lower grade processors should do fine, but requires further investigation).
We use "Debian unstable" distribution, booting it from PXE/NFS on aufs overlayed file system (overlay FS still has uncorrected bug with NFS as backing FS).
We are using RPM software to remotely power on/power off our thin clients.
You can obtain it from https://github.com/Seitanas/rpm
Our hypervisors
We use two HP bl460c g9 servers to provide 36 VDI clients. Servers are loaded at aproximately 50% on heavy load time. This does not include playing video on VDI, since that consumes much more CPU time, but is at par to VMware horizon without Nvidia GRID.
We use SSD drive to store our "initial image" - initial bootup of 18 VDIs on each of hypervisor requires loads of drive read speed.
We use second SSD to store temporary ("virtual snapshots").
We store "source machine" image on shared NFS storage, since it must be accesable on each hypervisor to use "copy disk from source" function. One must remember to start "source machine" on single hypervisor, because it will potentially corrupt VMs image if ran on multiple nodes.

