

This is a Facebook Messenger Node.js chatbot App with Wit.ai integration. This App is NLP based, voice-enabled, and invokes Handover Protocol from/to the page Inbox. In this tutorial, we will explore the App features, and discuss the setup steps. Then, we will explain how to customize your unique experience, and deploy the final App. With this App, you can create a unique Messenger chatbot experience, only in few minutes. You don't need to write or change any code, and you can train the App using the simple Wit.ai console. You can edit the App responses and configuration from a JSON file. It is an easy and simple process!
When you connect this App to your Facebook page, it can reply to the page messaging. If the App is in control, it will read the message, and use Wit.ai to understand the user intent from the text or voice input. Then the App will respond to the user with a predefined response which you can add for each intent. Moreover, the App can pass the conversation to the page inbox if the user needs customer service. In this case, the chatbot App will listen, and won't respond to the user input. The human agent can pass the conversation back to the chatbot from the page Inbox. Besides, this App can work with any language Wit.ai supports.

- Messenger Profile: When you setup the App, it will update the Messenger profile for the page. It will update the greeting message which the user see before he start the chat with your page. Moreover, it will activate the get started button, and set up a persistent menu. Finally, it will subscribe the App with the page, and update the callback url.
- NLP & Voice-enabled: The App uses Wit.ai for Natural Language Processing. It also supports voice recognition. This will make your chatbot more smarter! You can add new intents at any time from the Wit.ai App Dashboard. Also, you can keep training and improving your App while it is live. You will find the live data in the Wit.ai console!
- Handover Protocol: This App is ready to use handover protocol from/to the page Inbox. In the persistent menu, there is a default button that will pass the conversation to the page Inbox. The human agent can pass the conversation back to the App from the Inbox.
- Referrer & Web Plugin: If you want to have a different experience for specific users! This App can have a different get started message for users based on the sources. You can use links like
https://m.me/page_id?ref=or QR codes. Each can have a different experience by using different starting Message. Moreover, the home page for this App have a Chat plugin with some sample controls. - Configuration File: This App has a configuration file in JSON format. You can add new intents and entities with any response type and count for each. Also, you can customize the greeting message, and the persistent menu from this file.
Facebook Page: You need to have a Facebook page to use with this App. When the users chat with your page, this chatbot App will take over the conversation and respond. To create a new Page, click here.
Facebook Developer Account: You need a Facebook Developer Account to use this experience. If you don't have an account, create a new one from the Facebook Developers website. Click "get started" on the top right of the page, and complete the steps.
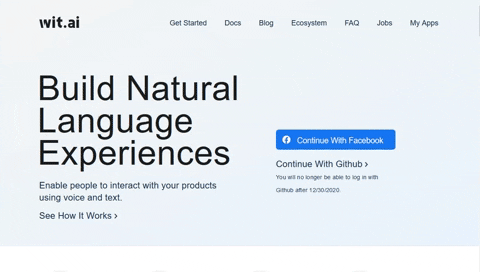
Wit.ai Account: You need a Wit.ai account to create a new Wit App and train it for the intents. To create one, go to Wit.ai website, and click "Continue with Facebook".
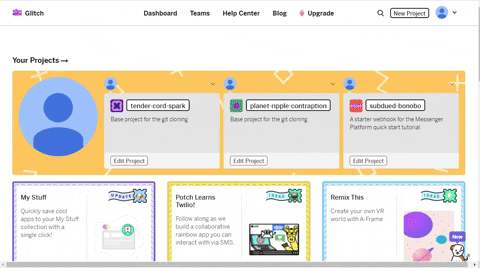
Node.js & NPM: Node.js preferred version "latest" & NPM preferred version "latest". If you don't have them on your machine, go to Node.js Website to download Node.js & NPM. You can use Glitch to run the App without installing Node.js on your machine.
FFMPEG Framework: This framework help trans code audio formats from "mp4" to "mp3". The installation is different for each operating system. For windows users, you can read this article which explains how to set it up. If you cannot set it up, use Glitch to run the App, and you will have it ready to use.
Local Tunnel Service: To expose the App from your local machine to public, you need a local tunnel service. If you don't have one, download ngrok from Ngrok.com website. This will gives you a link to use as a callback url, and to access the App webpages from any browser. If you will use Glitch, you don't need a local tunnel service.
You can download and run the App on your local machine, or you can use Glitch:
If you fork the repository, this will create a copy from the repository on your GitHub account. This can help you track your personal changes. Also, you can clone this source copy without fork. Open a new terminal and run the following commands to download the Repo to your machine.
// Clone the source:
git clone https://github.com/khaled-11/Messenger-Sample.git

// If you forked, clone your copy:
git clone https://github.com/your-user-name/Messenger-Sample.git
Go go Glitch website, and create a new project. Click "import from GitHub" and enter the repository link. If you forked the Repo, enter your link https://github.com/your-user-name/Messenger-Sample.git. If not, enter the link for source code repository https://github.com/khaled-11/Messenger-Sample.git.
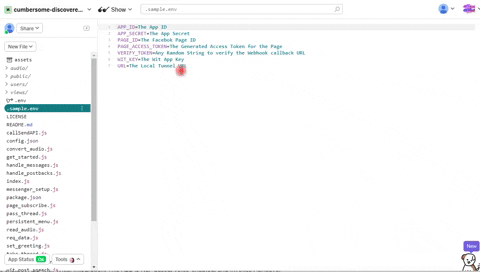
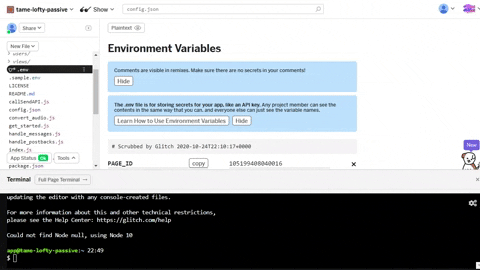
Whether you cloned the code on your local machine or you are using Glitch, we need to gather some data. In the main folder (Messenger-sample), you will see a file called .sample.env, open this file. You will see APP_ID, APP_SECRET, PAGE_ID & PAGE_ACCESS_TOKEN. We will get these information from the Facebook developer account. The VERIFY_TOKEN is any random string you choose to verify the call back URL. We will get the Wit key from the Wit.ai website after we create an App. The URL field is the https:// link for the App server. If you use your local machine, enter the local tunnel link. For ngrok, run the command ngrok http 3000 and use the provided https:// link. If you use Glitch, enter the project URL from the share button.
** If you use your local machine to run the App, rename .sample.env to .env and update the data. If you use Glitch, add the environment variables to the Glitch .env file.
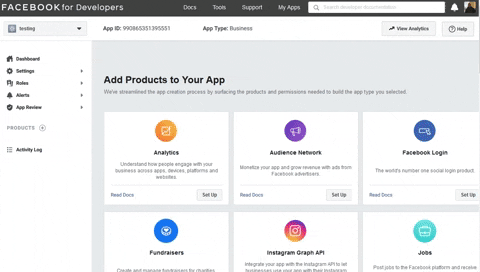
After you create an account, if you didn't have one, create a new App. Select "Manage Business Integrations", then click continue. When the App loads, scroll down and look in the products for "Messenger". Click setup on the Messenger Icon, and wait for the App to load. Scroll down and click "Add or Remove Pages". Continue with your account and choose the page which you want to integrate with the App. Now, you will see the page and a button "Generate Token". Click this button, check "I understand", and copy the token. This token can now control your page messaging, so don't share it with anyone. Add this token to the environment variables in the .env file. Go back to the same page, you will see the page id under the page name, copy it and add it to the variables. On the same page, you will see the App ID on the top of the page. Copy the app id, and add it to the file. Now, we need only the App secret from the Facebook Developer account. In the same App page, above products, you will see "settings" tab. Expand the menu, and go to basic settings. You will see the App secret on the top right corner. Click "show", and copy the App secret. Add it to the file, and now we finished with what we need from the Facebook Developer account.
Go to Wit.ai website, and click "Continue with Facebook". Create new App, fill the details, and wait for the App to load. In the app dashboard, click setting and copy the "Server Access Token". Add it for the WIT_KEY field in the .env file. Now we have the .env file ready!
Now, we have completed the required environment variables and the App is ready to run. If you use Glitch, open a new terminal from tools and run the following two commands. If you use your local machine, open a new terminal and navigate to the App folder. Run the same two commands in order. The first command will download the required packages to the project folder. The second one will start the App server.
npm install
node index.js
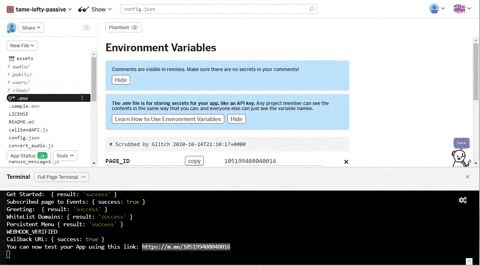
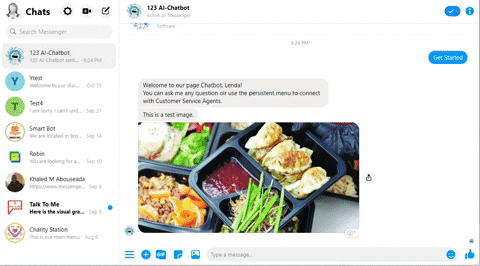
The App will now connect the Facebook page, and update the callback URL. If there is any errors, you need to double check the environment variables. After the updates, you will see a link which you can use to access and test the App. Delete any open conversation between you and the page before you proceed. Go to the link, and you will see an updated greeting message, and the Get Started Button. When you click get started, you will see a default starting messages "three in a row". Also, you will see a persistent menu with a "Customer Service" button. This button will handover the conversation to the page inbox, but we need a quick setup to activate it. Also, we will need to add some intents and train the Wit App with some utterances to test this demo.
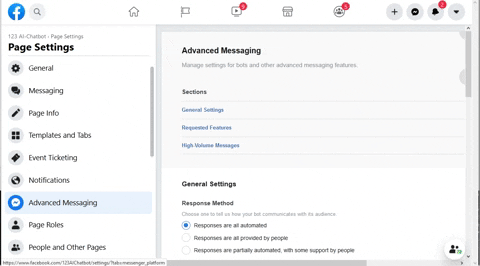
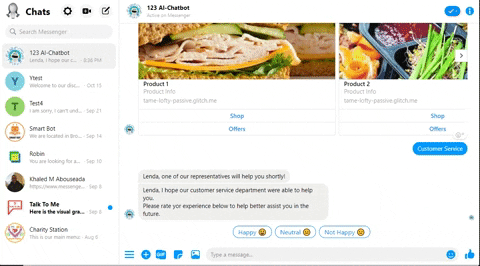
Go to the Facebook page settings, then advanced Messaging. You will find "Handover Protocol" & "Messenger receiver". Click "configure" then choose this App as primary receiver. Choose the page inbox as a secondary receiver, and it is now ready! When the user click "Customer Service" from the persistent menu. The App will pass the conversation to the page inbox. You can assign the conversation to other admins or reply to the user. After you finish with the customer, click "move to done" from the inbox. Now, the handover protocol will hand the thread control back to the bot. In this Demo we follow with a survey, but you can have a different response.
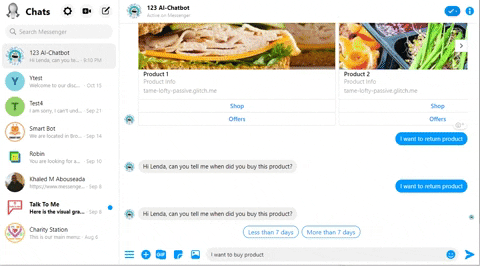
To test this demo, we need to create some sample intents & entities that matches the config file. Go to the Wit App console, and start by adding utterances from the dashboard. Add "I want to shop" and create a new intent called "shop_products". Train the App with similar utterances for this same intent. This intent will help the App understand if the user wants to shop the products. Train the App for a new intent called "welcome". Choose some utterances like "welcome", "how are you". Finally, create a new intent called "question". This intent will have two entities as in the config file. One entity is "return product", and the other is "buy product". Train the App with utterances like "I want to {return product}", "I want to {buy product}".

Now, we finished all the steps to test this sample application. Open the conversation with your page again and test the intents. Also, test the App with audio input. It will work, and now the time to customize your experience.
To customize this experience, you need to create intents and train the Wit App. Then, you can add responses to these intents in the config.JSON file. You can add responses for post-backs same way as for the intents. Also, you can change the greeting messages, and edit the persistent menu items from the same file.
Open the config.JSON file in the main directory. You will see the first two sections called "greeting" and "persistent_menu". In the greeting section, you will see three different messages. The first one is for regular Messenger users. The second and third are for the the web plugin in App the home page. Then, you will see the persistent menu items. You can add many items and choose the type for each. To update the greeting and the persistent menu, you will need to restart the App server.
    "greetings":{
        "greeting":"Hi {{user_first_name}}, welcome to our page Chatbot!",
        "web_greeting_logged_out":"Welcome to our website, please login to keep your chat history!",
        "web_greeting_logged_in":"Welcome to our website. you can continue with your account to see the history!"
    },

    "persistent_menu":[
        {
            "locale": "default",
            "composer_input_disabled": false,
            "call_to_actions": [
                {
                "type": "web_url",
                "title": "Facebook Page",
                "url": "https://www.facebook.com/{{page_id}}"
                },  {
                    "type": "web_url",
                    "title": "Website",
                    "url": "https://www.techolopia.com"
                }, {
                    "type": "web_url",
                    "title": "Shop",
                    "url": "https://www.facebook.com/techolopia"
                }, {
                    "type": "postback",
                    "title": "Customer Service",
                    "payload": "CS"
                }
            ]
        }
    ]
You can add more intents and train the App from the Wit.ai console. You can have intents with or without entities. Intents without entities can be for specific question or welcome intent. Entities add more specifications for the intent. For example, when the user say "I want to buy a phone" or " I want to buy a laptop". In both cases the user want to buy, but in each a different item (entity). There are many use cases and examples on the Wit.ai website.
After you add the intents and train the Wit App, you need to enter the responses. Open config .JSON and add a response for each intent and entity.
This section explain what responses you can add in the config file. There is an example for each category and type.
The intent category has some error messages and the reponses for intents with or without entities. These error messages handles the technical issues and out of scope intents. The format for the intents only response is different than intents with entities.
"intents":{
"voice_read_error":{
"response" : {"text": "I am really Sorry, we are having technical issues right now.\nPlease can you try again!"}
},
"no_sound":{
"response" : {"text": "I am sorry, but I didn't hear any words."}
},
"setup_needed":{
"response" : {"text": "I am really Sorry, the voice is not set up yet!"}
},
"non_audio":{
"response" : {"text": "Sorry, we accept only voice attachments!"}
},
"technical_issue":{
"response" : {"text": "I am really Sorry, we are having technical issues right now.\nPlease can you try again!"}
},
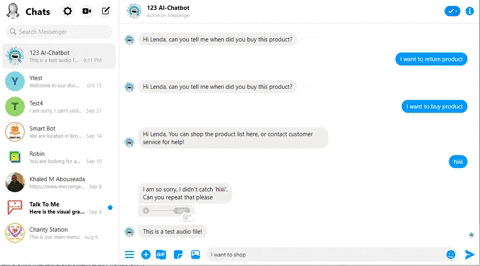
"out_of_scope":{"responses":[
{
"response" : { "text":"I am so sorry, I didn't catch '{{text}}'.\nCan you repeat that please"}
}, {
"response":{"file":"./audio/blank.mp3"}
}, {
"response" : { "text":"This is a test audio file!"}
}
]},
The format for the intent without entities is as the following example. The intent name will have reponses array, and each response can be a different type. You can refer to the response types section to mix any type of response.
        "shop_products":{
            "responses":[
                {
                    "response" : {"text": "Here is our popular products:"}
                }, {
                    "response" : {"attachment":{
                        "type":"template",
                        "payload":{
                          "template_type":"generic","elements": [
                          {"title": "Product 1" , "subtitle":"Product Info", },
                          {"title": "Product 2" , "subtitle":"Product Info", },
                          {"title": "Product 3" , "subtitle":"Product Info", }
                        ]}
                    }}
                }
            ]
},The Format for intents with entities is as the following example. The intent name will have entities instead of responses. For each entity, we will add the entity category name and the entity name. Then we will enter the responses as for intents and postbacks for each entity. You can add entity_not_in_config_errors & entity_type_not_found_error to handle some errors. These errors can be the entity not included in the Wit App, or the entity not found in the config file.
        "question":{
            "entities":
            [
                {
                    "entity":"question_type",
                    "name":"return product",
                    "responses":[
                        {
                            "response" : {"text": "Hi {{user_first_name}}, can you tell me when did you buy this product?", "quick_replies": [
                                {
                                  "content_type":"text",
                                  "title":"Less than 7 days",
                                  "payload":"DEMO"
                                }, {
                                  "content_type":"text",
                                  "title":"More than 7 days",
                                  "payload":"DEMO"
                                }
                              ]}
                        }
                    ]
                },
                {
                    "entity":"question_type",
                    "name":"buy product",
                    "responses":[
                        {
                            "response" : {"text": "Hi {{user_first_name}}, You can shop the product list here...!", "quick_replies": [
                                {
                                  "content_type":"text",
                                  "title":"Shop",
                                  "payload":"SHOP_PRODUCTS"
                                }, {
                                  "content_type":"text",
                                  "title":"Customer Service",
                                  "payload":"CS"
                                }
                              ]}
                        }
                    ]
                }
            ],
            "entity_not_in_config_errors":
            {
                "text": "I think you need to ask question, but I am having a trouble with the question type.\nPlease choose from below:","quick_replies": [
                    {
                      "content_type":"text",
                      "title":"Buy Product",
                      "payload":"DEMO"
                    }, {
                      "content_type":"text",
                      "title":"Return Product",
                      "payload":"DEMO"
                    }
                ]
            },
            "entity_type_not_found_error":
            {
                "text": "I think you need to ask question, but I am having a trouble with the question type.\nPlease choose from below:","quick_replies": [
                    {
                      "content_type":"text",
                      "title":"Buy Product",
                      "payload":"DEMO"
                    }, {
                      "content_type":"text",
                      "title":"Return Product",
                      "payload":"DEMO"
                    }
                ]
            }
}For post-backs section, it is like intents without entities. We will have same array with responses, but with the postback payload instead of the intent name. For each payload you will create in the menu or buttons in responses, you need an item here. In this section, you will find default messages for handover protocol. The App sent these messages when the user moved to/from the page inbox. You can edit these messages as well.
    "postbacks":{
        "HANDOVER_TO_INBOX":[
            {"response" : {"text": "{{user_first_name}}, one of our representatives will help you shortly!"}}
        ],

        "GUEST_TO_INBOX":[
            {"response" : {"text": "{{user_first_name}}, please login with your Facebook account to connect with our customer service!"}}
        ],

        "HAPPY_PAYLOAD":[
            {
                "response" : {"text": "We are excited, {{user_first_name}}! We are so happy that we were able to assist you today!"}
}As we saw, each intent, entity, and post-back can have many responses in an array structure. Each response can be in the form of the following types
The response payload can have a text with a string value only. This will send the user only the string in the text field. You can add emoji to the text using copy and paste. If you want to add quick replies with the text, add quick_replies array to the response. Enter the replies elements, and choose web_url or postbacks for the buttons.
You can have a template response with many elements is carousel. The payload will be an array of elements. Each element in this array can have different buttons. You can have elements with or without images by removing the image_url field.
You can send a file from the server as a response. The file can be text, image, or audio file. The payload of this response will be the path to the file.
Whether you used Glitch or your local machine and you don't expect high traffic. You have the option to keep the App running on your local machine or Glitch. If you want to scale your App, you can use any cloud hosting service. Make sure the hosting service supports Node.js Apps, and check for FFMPEG framework. For Heroku Apps, you can add the build using the following command heroku buildpacks:add https://github.com/jonathanong/heroku-buildpack-ffmpeg-latest.git. Read this Article to see how to deploy Node.js App to Heroku. Also, this article explains more options to use FFMPEG.
You can test a live demo version using this link: https://m.me/123AIChatbot