This is a motor control task in which participants make lower limb movements (e.g., knee flexion/extension) while Inertial Measurement Units (IMUs) control a cursor on a screen and move it between two points. Obstacles sometimes appear, and the participant is asked to avoid the obstacle. This code uses MotionNode sensors and borrows heavily from their SDK. This task was created by Phil Desrochers for the Motor Development Lab at Boston University. Note: This task was my first time using Python, so don't judge my janky code too much.
PURPOSE: The purpose of this task is to investigate how participants are able to make adjustments to online movements of their lower limbs as task constraints change.
- README.md: You're looking at it! This file provides info about the task, the files in this repository, and other info.
- LL_obstacle_avoidance_task_IMU.py: This is the main file that runs the task
- MotionSDK.py: This file is made by MotionNode and supplies functions used to read data from the IMUs
- Calibration.py: This file is used to account variation in the placement of the IMU on the participants leg, and also to account for the participant's subjective "straight ahead" knee flexion/extension.
- trial_conditions_example.txt: This text file contains the condition numbers for each trial run in a PRACTICE block. Any block calling this text file will run the number of trials equivalent to lines in this file (i.e., this file determines the number of trials in a block, as well as the condition type of each trial).
- trial_conditions.txt: This text file contains the condition numbers for each trial run in an EXPERIMENTAL block. Any block calling this text file will run the number of trials equivalent to lines in this file (i.e., this file determines the number of trials in a block, as well as the condition type of each trial).
- LICENSE: This file provides a Creative Commons License for this project
There are 5 trial types (i.e., conditions) in this task:
- No Obstacle (Condition 0)
- Obstacle appears prior to cue (Condition 1)
- Obstacle appears with cue (Condition 2)
- Obstacle appears with movement onset (Condition 3)
- Obstacle appears at 20% of movement amplitude (Condition 4)
This purpose of this condition design is to probe how the motor system is able to alter online movements when new information is supplied at different stages in the motor planning/execution process.
In the trial_conditions.txt and trial_conditions_example files the condition of each trial is denoted by the condition number on each line, one line per trial.
This task is run via python. The best way to download python is to get the most current Anaconda release.
This task also uses Pygame, a python module used to design and run simple computer games. To download pygame:
- Open anaconda prompt
- type
pip install pygame, and hit Enter.
This task needs to be downloaded from github to use. You can download it as a zipped folder, or clone this repository to your computer. While the task can also be stored on the lab drive, DO NOT run the task from the drive - run the task from a local location. If you run the task from the lab drive, the task will lag because the task needs to read/write over an internet connection.
MotionNode IMUs need to be applied to the participant in a specific way for this task:
-
Place velcro straps on participant thighs and shanks. Longer straps are for the thighs, shorter straps for the shanks. Straps should be tight, but not overly so. Thigh straps should be placed approximately 1/2 way between the lateral epicondyle of the femur (outer knee) and great trochanter of femur (outer hip). Shank straps should placed approximately 1/2 way between the lateral epicondyle of the femur and the lateral malleolus of ankle. Make sure that the velcro part of the strap is not on the outside of the leg, as that is where the IMU will be placed. TIP: It is best if participants are asked to wear shorts or athletic clothes for the experiment.

-
Don the IMU belt, positioning the waist IMU in the center of the back, at approximately the L4 vertebra.
-
WARNING: THIS STEP IS CRITICAL. The IMUs are labeled according to their segments. They should be placed on the OUTSIDE of the leg on their respective segments, WIRES UP. This is particularly important for the shank IMUs, which are the IMUs drive the task. Do your best to place the IMUs such that they'll move in the sagittal plane. Note: I like to wiggle the IMUs into the velcro to make sure the velcro digs in well. You can also wrap the IMUs in athletic prewrap to keep them secure. Wire slack can be taken in with clips.

- On the IMU system, plug in the battery via the USB cord that comes off the central rectangular unit.
- When the small white light on the central unit shows solid white, connect via wifi to "Bus" on the computer you will use.
- Open MotionNode software
- Click "Devices"
- Click "Scan for Devices"
- When "Bus" appears, click "Bus". MotionNode should now be connected to the IMU system.
- Click "Help". Click "Calibrate". With IMUs motionless, click "Start". Wait until the calibration is complete.
- Click "Node Viewer". Hover over the "+" button in the bottom right of the screen. Hit the ">" button to connect to the IMUs. Select a node (an IMU). The animation should now follow the motion of the IMU.
- Make sure the IMUs sample at 100 Hz
-
Seat the participant with the IMUs on in front of the computer. Make sure the participant can comfortably flex and extend their legs.
-
Open Anaconda Powershell Prompt. This should be located with the Ananconda installation in the Start Menu or Apps menu, or you can search this on the computer and it should come right up.
-
Change the directory to the place where LL_obstacle_avoidance_task_IMU.py is stored on the computer. For Laptop Z, these should be in a folder called LL_obstacle_avoidance_task_IMU-main which itself is in the Documents folder. To change the directory, use the "cd" command, followed by the directory of the folder in quotes. For example:
cd "C:\Users\philc\Documents\LL_obstacle_avoidance_task_IMU-main" -
To run the task, type the following:
python LL_obstacle_avoidance_task_IMU.py --header --datafile="mydatafile.txt" --trialfile="mytrialfile.txt"The text "mydatafile.txt" and "mytrialfile.txt" are where the data are saved. These can be replaced by another valid filename (i.e., subject number, etc.). More on output below.
The task consists of several blocks, in this order:
- Calibration Block: During this period, the participant makes repetitive knee flexion-extension movements for about 10 seconds. These movements are used to account for variability in the IMU placement on the leg, and determine the participant's subjective "straight ahead" leg movements. Participants should be verbally encouraged to move their leg in a straight forward and back manner. These movements don't need to be overly fast, but should be nice and smooth.
- Practice block: 16 trials which allow the participant to understand the tasks. The obstacle appears every other trial, and the obstacle trials cycle through the 4 obstacle conditions twice.
- Calibration Block
- Experimental Block 1: 40 trials. Trials are pseudorandomly presented across the 5 conditions. Consists of 20 non-obstacle trials and 5 trials of each obstacle condition. Subsequent Experimental blocks follow this structure.
- Calibration Block
- Experimental Block 2
- Calibration Block
- Experimental Block 3
- Calibration Block
- Experimental Block 4
- Calibration Block
- Experimental Block 5
Instructions are presented to the participant prior to the Practice Block and each Experimental Block. Each Instruction page can also serve as a break period.
This task puts its output in two files, which you named when you ran the code (in this README, they are "mydatafile.txt" and "mytrialfile.txt"). WARNING: when generating the output, the code looks to see whether the file exists in the current directory; if the file doesn't exist, it creates it. If the file already exists, it appends the data onto the file. Thus, to avoid appending data from one task run onto a prior task run, make sure that the file names change from one run to the next, or move the created files out of the directory between runs. Commas delimit columns.
The datafile, or "mydatafile.txt", captures the data on a sample by sample basis (i.e., each row is 1 sample). Variables included in this output are:
- sampleNum: this is the sample number which counts up from the start of the experiment
- trial_sample: this sample number counts up from the start of an individual trial
- block: the block number in the task (0 = Practice, 1-5 refer to the experimental blocks)
- trial: the trial number within a block
- trial_cond: the trial condition
- Bus.gx through Node05.rz: gyroscope (g) and rotation (r) data in each dimension (x, y, z) for each IMU.
- CursorX: The x location of the cursor in pixels
- CursorY: The y location of the cursor in pixels
- cue_on: a logical value indicating whether the cue has turned on
- move_out: a logical value indicating that the participant is moving from the home posiiton to the target
- move_back: a logical value indicating that the participant is moving from the target to the home position
- show_obstacle: a logical value indicating whether the obstacle is present on the screen
- obst_hit: a logical value indicating whether the cursor contacted the obstacle
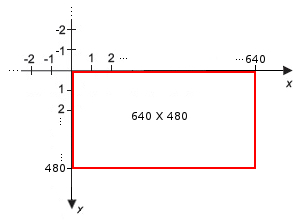
A note about the cursor location - it's a little weird. The coordinate system origin for pygame is located in the upper left corner of the window. Thus, increasing X numbers mean the cursor is moving rightwards on the screen. Increasing Y numbers unintuitavely mean the cursor is moving downwards on the screen (see picture below; the red box indicates a given screen). So, a little math will have to be done in post-processing to change these coordinates to a normal cartesian coordinate frame (this is something I'd look to fix in updates of this task).
Importantly, the first trial_sample of each trial will ALWAYS have the cursor in the center of the home position, and these can be considered the origin. To convert to a normal cartesian coordinate system, subtract this X and Y from the X and Y location of the cursor in every sample, and then invert the Y axis. I know it's a pain, sorry.
The trialfile, or "mytrialfile.txt", captures the data on a trial by trial basis (i.e., row is one trial). Variables included in this output are:
- block: The block of the experiment (0 = Practice, 1-5 are the Experimental Blocks)
- trial: The trial number within a block
- trial_cond: The trial condition
- trial_start_time: The time since the beginning of the experiment in milliseconds when the trial started.
- cue_on_time: The time since the beginning of the experiment in milliseconds when the cue turned on for a given trial since
- move_start_time: The time since the beginning of the experiment in milliseconds when the participant first began to move
- obst_hit: a boolean value indicating whether the participant contacted the obstacle during the trial (0 = successful avoidance, 1 = hit)
- curs_in_obst_time: The time since the beginning of the experiment in milliseconds when the participant hit the obstacle. If obst_hit is 0, this number is meaningless (interited from the last time the obstacle was hit).
- curs_in_targ_time: The time since the beginning of the experiment in milliseconds when the participant hits the target.
- trial_abort: If the participant does not complete the trial within 20 seconds, the trial aborts and the experiment moves on to the next trial; all data for these lines are invalid (1 = trial aborted, NA = trial not aborted).
Feel free to contribute, share, and post issues.
- Modify cursor position output
- Modify timing output so it's relative to the trial start instead of the experiment start
- Add code for use with left leg.
HAPPY EXPERIMENTING